

Do you want to know the number one secret for your new mini cooling box? It is a simple habit that changes everything.
Always pre-chill your items and the cooler itself before packing.
This single step is the biggest game-changer for performance. Understanding how to use your cooler this way is crucial. This guide offers simple tips to turn your box into a powerful personal cooler. Following these easy tips will help you get the most out of your gadget from day one.
PACKING YOUR MINI COOLING BOX
You have your mini cooling box, and you are ready for an adventure. How you pack it makes all the difference. Proper packing is one of the best tricks for great performance. Let’s explore how to use your cooler to get the best results and superior ice retention.
THE GOLDEN RULE OF PRE-CHILLING
We mentioned this in the intro, but it is so important it needs its own section. You must cool everything down before it goes into the cooler. Putting warm items inside forces the cooler to work much harder, melting your ice quickly.
Pro Tip: For the best results, prechill your provisions in the refrigerator overnight. You should also prechill your cooler for at least two hours with a sacrificial bag of ice or some frozen packs before you load it.
This simple habit sets you up for success from the very beginning.
USING BLOCK ICE VS. CUBES
The type of ice you choose plays a huge role in your cooler’s performance. Each type has a specific job. Understanding their differences is key to learning how to use an ice box effectively.
| Ice Type | Cooling Speed | Melting Rate | Best Use Case |
|---|---|---|---|
| Cubed Ice | Faster | Quicker | Chilling drinks and food rapidly |
| Block Ice | Slower | Slower | Long-lasting cooling for multi-day trips |
Cubed ice has more surface area, so it cools things down fast. However, it also melts fast. Block ice melts much more slowly, making it perfect for keeping the cooler cold for days. For the best of both worlds, use a combination of block ice on the bottom and cubed ice to fill in the gaps.
A great way to make ice last longer is by using frozen water bottles. They act like block ice, are reusable, and give you cold drinking water as they thaw. This is a cost-effective and flexible option.
SMART LAYERING FOR BETTER COOLING
How you layer your contents can dramatically improve cooling efficiency. A smart layering strategy keeps your food organized, safe, and cold. Think of packing your cooler like a puzzle.
- Start with a Base of Ice: Place a layer of block ice or frozen water bottles at the very bottom. This creates a solid cold foundation.
- Add Waterproof Items: Next, add your most durable and waterproof items. This includes canned drinks or food in well-sealed containers.
- Layer with More Ice: Add a layer of cubed ice on top of the first food layer. A good guideline to follow is the 2:1 rule, meaning you should aim for twice as much ice as contents by volume for optimal ice retention.
- Place Delicate Items on Top: Put items that could get crushed or soggy, like sandwiches in bags or fresh vegetables, on the very top layer. This keeps them safe and easy to access.
This method ensures cold air circulates effectively and protects your food.
MAXIMIZING SPACE AND AIRFLOW
A full cooler is a happy cooler. Empty air space is your enemy because it warms up quickly each time you open the lid. Your goal is to fill as much of that space as possible.
- Fill the Gaps: After layering your main items, use extra cubed ice to fill in all the empty nooks and crannies. This leaves less room for warm air.
- Use Dividers: You can use simple cardboard cutouts or plastic dividers to organize different types of food and keep everything in its place.
- Line with Foil: For an extra boost, you can line the inside of your well-insulated ice box with aluminum foil before packing. Aluminum reflects 97% of radiant heat. This simple step helps reflect heat that enters when you open the lid and helps lock the cold in.
By packing smart, you ensure every inch of your cooler is working to keep your items perfectly chilled.
POWER AND PLACEMENT TIPS
Where you put your mini cooling box and how you power it are just as important as how you pack it. These thermoelectric coolers rely on electricity to move heat from the inside to the outside. Your placement and power choices directly affect how well your cooler works. Let’s cover some essential tips to keep your unit running efficiently.
CHOOSING YOUR POWER SOURCE
Most mini coolers use a Peltier element, which draws a continuous stream of power. This makes choosing the right power source crucial for performance and avoiding dead batteries. These coolers typically use a 12V adapter, but their power consumption can be significant.
Thermoelectric coolers are known for their high power consumption. This can drain batteries faster than you might expect. You have a few options for power, each with its own pros and cons.
- Car’s 12V Outlet: This is convenient for road trips. However, running a 50W cooler can drain your car’s battery in just 3-4 hours if the engine is off. You should only use this source while driving.
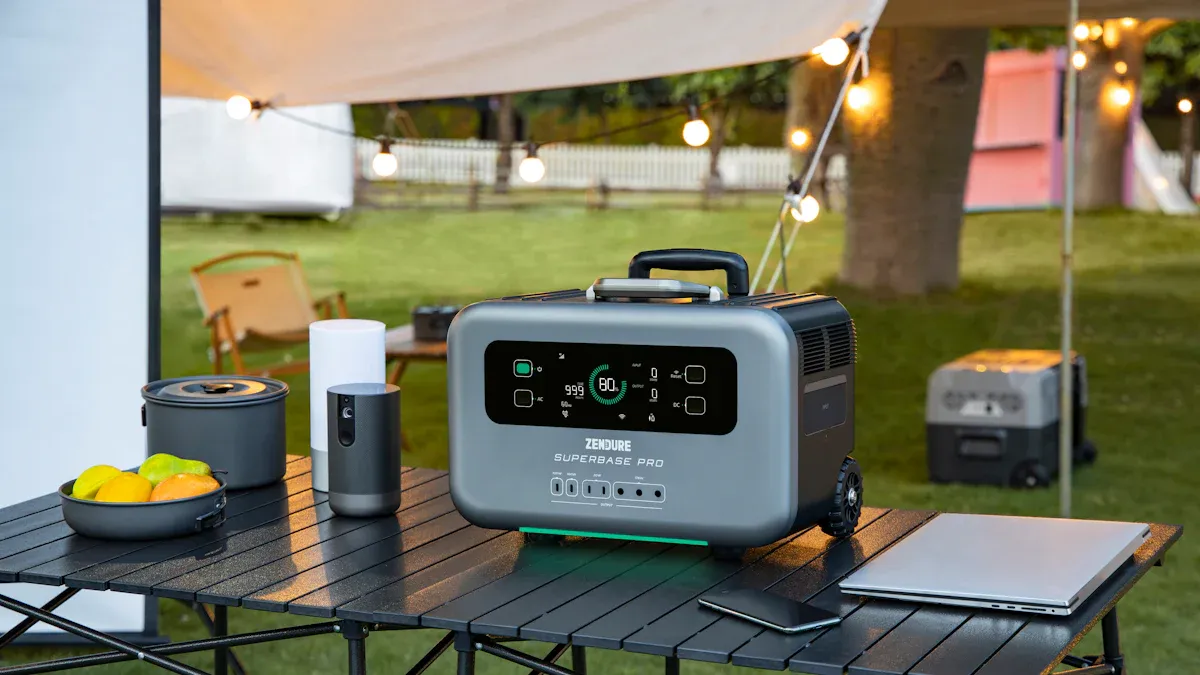
- Portable Power Station: A dedicated battery box or power station is a much safer bet. A good one can power a 50W cooler for 12-24 hours. This gives you flexibility at a campsite or during a long stop.
- AC Wall Outlet: When you are at home or in a hotel, you can use a standard wall outlet. This is the most reliable option for pre-chilling your cooler before a trip.
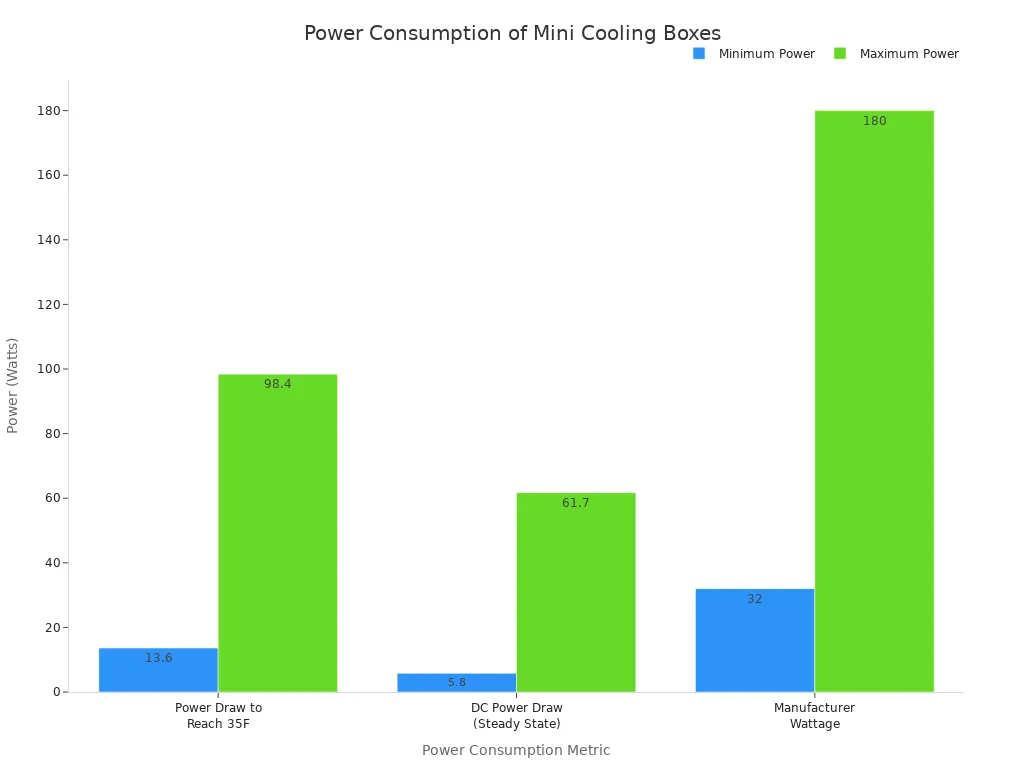
| Metric | Power Consumption Range |
|---|---|
| Power Draw to Reach 35°F | 13.6 W to 98.4 W |
| DC Power Draw (Steady State) | 5.8 W to 61.7 W |
| Manufacturer Wattage | 32 W to 180 W |
Expert Tip: If you use your vehicle’s battery, consider buying a battery voltage monitor. These devices cost around $30. They help you ensure your battery’s voltage does not drop below 12.2V, preventing you from getting stranded.
THE IMPORTANCE OF VENTILATION
Your cooler works by pulling heat out of the insulated box and releasing it into the surrounding air through vents. If you block these vents, the heat has nowhere to go. This forces the unit to work harder, reduces cooling power, and can even damage the cooler.
Proper ventilation is one of the most overlooked tricks for a thermoelectric cooler. You must give your unit room to breathe. Look out for these signs of poor ventilation:
- Condensation: You see moisture building up inside the unit.
- Excessive Heat: The outside of the cooler feels very hot to the touch.
- Strange Odors: You notice unusual smells coming from the unit.
- Poor Performance: The cooler struggles to stay cold or shuts down unexpectedly.
To avoid these problems, follow these clearance rules when placing your cooler, especially in a vehicle.
- Rear Clearance: Leave at least 4–6 inches (10–15 cm) of space behind the unit. Most coolers exhaust heat from rear vents. Blocking this area can reduce cooling efficiency by up to 40%.
- Side Clearance: Maintain 2–4 inches (5–10 cm) of space on the sides. This allows the cooler to draw in fresh, ambient air.
- Bottom Clearance: Elevate the cooler about 0.5–1 inch (1–2 cm) off the floor. This prevents it from sitting directly on carpet, which can trap heat.
Never stack gear or other items against the vents. Always check that air can flow freely around the entire unit.
FINDING A COOL, SHADED SPOT
The environment around your cooler has a huge impact on its performance. Direct sunlight is its worst enemy. Solar radiation will heat the exterior of the cooler, forcing it to work much harder to keep the inside cold. This leads to more power use and faster ice melt.
Always try to place your cooler in a cool, shaded area. Here are some simple ways to protect it from the sun:
- Park in the Shade: Whenever possible, park your car in a shady spot to keep the cabin temperature down.
- Use Sunshades: Place reflective sunshades on your car windows to block direct sunlight from hitting the cooler.
- Position it Wisely: Inside a vehicle, place the cooler on the floor and away from windows. Avoid putting it on a dashboard or seat where the sun can beat down on it.
- Create Your Own Shade: At a picnic or campsite, place the cooler under a tree, an umbrella, or a tarp.
Following these placement tips will significantly boost your cooler’s efficiency. It will use less power and keep your food and drinks colder for much longer.
WHAT TO STORE (AND WHAT TO AVOID)
Knowing what to pack in your mini cooling box can make your trip a success. The right items stay fresh and delicious, while the wrong ones can cause messes or spoil. This guide will help you choose the best contents for your cooler.
IDEAL ITEMS FOR YOUR COOLER
Your cooler is perfect for a variety of snacks and drinks. You can pack healthy and refreshing options that travel well. A good cooler for food storage keeps these items chilled and ready to enjoy.
Here are some great choices for your next outing:
- Fruits and Parfaits: Berries, grapes, and mangoes are excellent. You can also prepare fruit parfaits with granola and yogurt.
- Proteins: Pack hard-boiled eggs, string cheese, or sandwiches with cold cuts. Protein shakes and smoothies are also great on the go.
- Drinks: Stay hydrated with sparkling water. You can also bring canned iced coffee or kombucha for a refreshing treat.
These items make your cooler for food storage a portable pantry of delicious options.
FOODS TO KEEP OUT
Some items do not belong in your cooler. You should never place hot food directly inside. Hot food raises the internal temperature of the cooler. This can bring other food into the temperature “Danger Zone,” where bacteria grow quickly. It also forces the cooler to work harder and melts your ice much faster. Always let food cool down completely before you pack it. Avoid packing items that can get crushed easily unless they are in hard containers.
TEMPERATURES FOR DIFFERENT CONTENTS
Maintaining the right temperature is crucial for food safety. Bacteria multiply rapidly between 40°F and 140°F. Your cooler for food storage must stay at or below 40°F (4°C) to keep perishable food safe. This temperature slows bacterial growth and prevents spoilage.
Important Note: Perishable food should not be out of refrigeration for more than two hours. If the outside temperature is above 90°F, this time drops to just one hour.
Different items have different ideal temperatures. You can even use your cooler for skincare or certain medications, but always check their specific storage requirements. For example, unused insulin must be stored between 36-46°F and should never freeze. Skincare products are often best kept between 40-60°F.
Here are the recommended temperatures for common food items:
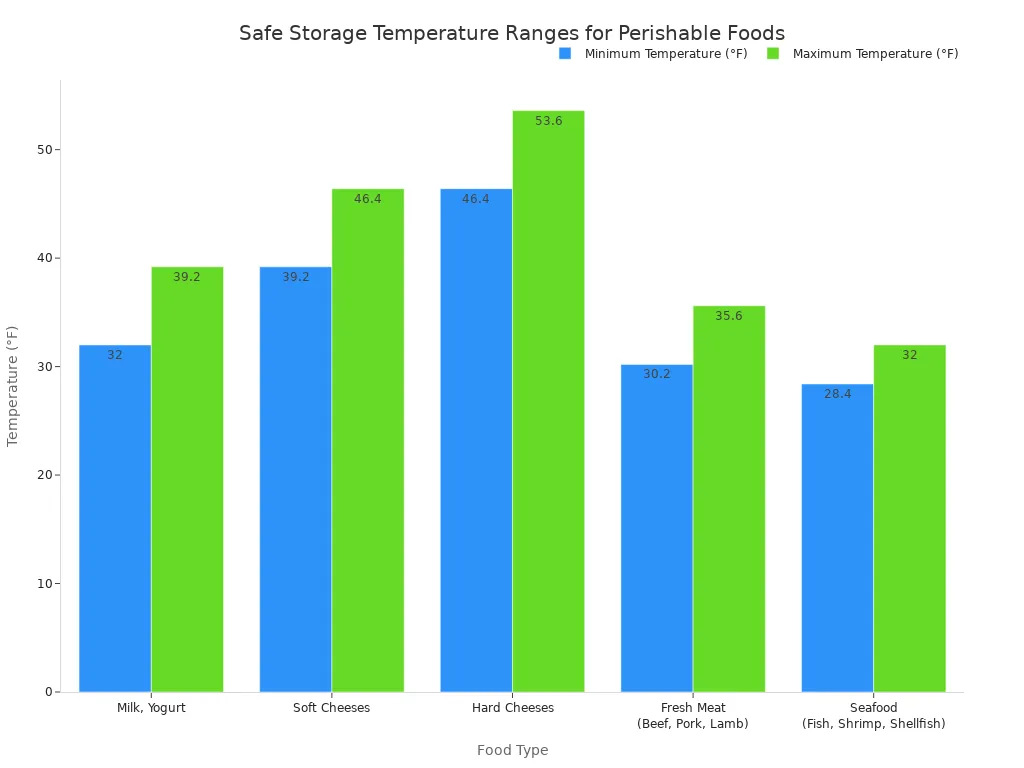
| Food Type | Recommended Temperature Range |
|---|---|
| Milk, Yogurt | 32°F – 39.2°F (0°C – 4°C) |
| Soft Cheeses | 39.2°F – 46.4°F (4°C – 8°C) |
| Hard Cheeses | 46.4°F – 53.6°F (8°C – 12°C) |
| Fresh Meat | 30.2°F – 35.6°F (-1°C – 2°C) |
| Seafood | 28.4°F – 32°F (-2°C – 0°C) |
CLEANING AND MAINTENANCE TIPS
Proper maintenance is key to your cooler’s longevity and performance. A well-made unit from a reputable manufacturer makes this process much easier. For example, investing in a brand like KUER, which has extensive R&D with over 50 patents and advanced rotomolding facilities, ensures you get superior seals and durability. This quality build makes cleaning more effective and helps maintain excellent ice retention over time. These simple maintenance tips will keep your cooler in top shape.
WEEKLY ODOR PREVENTION
You should clean your cooler after every use to prevent odors and bacteria from building up. Spills and moisture from melted ice create a breeding ground for germs. A clean interior is essential for good ice retention. You have several safe and effective cleaning options.
Pro Tip: Always empty any remaining water or ice after use. A dry cooler is a clean cooler.
For regular cleaning, you can use these solutions:
- Mild Dish Soap and Warm Water: This is the best choice for general cleaning after each trip.
- Baking Soda: Sprinkle it on tough stains or in smelly areas, add warm water, and scrub gently to remove odors.
- Vinegar Solution: Mix equal parts white vinegar and water for a great natural deodorizer.
- iClean mini: This device turns tap water into a powerful sanitizer that is 50% stronger than bleach but completely non-toxic and safe.
After cleaning, rinse the cooler thoroughly and wipe it dry to get it ready for your next batch of ice.
KEEPING THE FAN VENT CLEAR
Your cooler’s fan is its engine. It pulls heat out, so it needs clear airflow to work correctly. A dusty or blocked vent reduces cooling power, forcing the unit to work harder and shortening the life of the ice inside. You should check the vents regularly.
To clean the fan and vents, first unplug the unit. You can use a few simple tools:
- Vacuum Cleaner: Use a nozzle attachment to pull out loose dust and debris.
- Paintbrush: A long, thin paintbrush can help you gently sweep dust off the fan blades.
- Canned Air: A quick blast of compressed air can dislodge stubborn dust from the vents.
Many mini coolers also have a reusable filter. You should vacuum this filter and rinse it with hot water at least once a month. Let it dry completely before sliding it back in. These simple tips will ensure your cooler maintains peak performance and ice retention.
LONG-TERM STORAGE PREPARATION
If you plan to store your cooler for an extended period, proper preparation is crucial. Storing a damp or dirty cooler can lead to mold and permanent odors, ruining it for future use. Before you put it away, make sure all the ice is gone.
- Clean Thoroughly: Use one of the cleaning methods mentioned above to wash the interior completely. Get rid of any leftover food particles or sticky residue.
- Dry Completely: This is the most important step. Wipe the inside with a towel, then leave the lid open for several hours to let it air dry. Any moisture from melted ice can cause problems.
- Store with Lid Ajar: Prop the lid open slightly when you store it. This allows air to circulate and prevents musty smells from developing.
Following these steps ensures your cooler is fresh and ready for your next adventure, with its ice retention capabilities intact.
You now have the essential tips to master your new gadget. Remember these three simple habits for the best performance:
- Pre-chill everything before you pack.
- Give the fan space to breathe.
- Clean your cooler after each use.
These small steps quickly become second nature. You are now ready to make the most of your mini cooling box on your next road trip, at your desk, or in your dorm. Happy chilling! 🧊
FAQ
How long will ice last in my mini cooler?
The lifespan of your ice depends on several factors. You can expect ice to last longer if you use block ice and follow the 2:1 ice-to-contents ratio. Pre-chilling your items and the cooler itself also makes a huge difference in preserving your ice.
What should I do if my cooler isn’t getting cold enough?
First, check the fan vents for blockages. Your unit needs clear airflow to work well. Also, make sure you pre-chilled your items. Putting warm things inside forces the unit to work much harder and melts your ice faster. A full cooler with less air also stays colder.
Can I use my mini cooler to keep food warm?
Some thermoelectric models have a heating function. You should always check your specific model’s manual for its capabilities. Never put hot food inside a unit that is only designed for cooling. This can damage the unit and spoil your food.
Why is there water at the bottom of my cooler?
Water at the bottom is simply melted ice. This is normal.
Tip: You can use frozen water bottles instead of loose ice. They act as reusable ice packs and provide cold drinking water as they thaw, creating less mess.
 Request a quote