
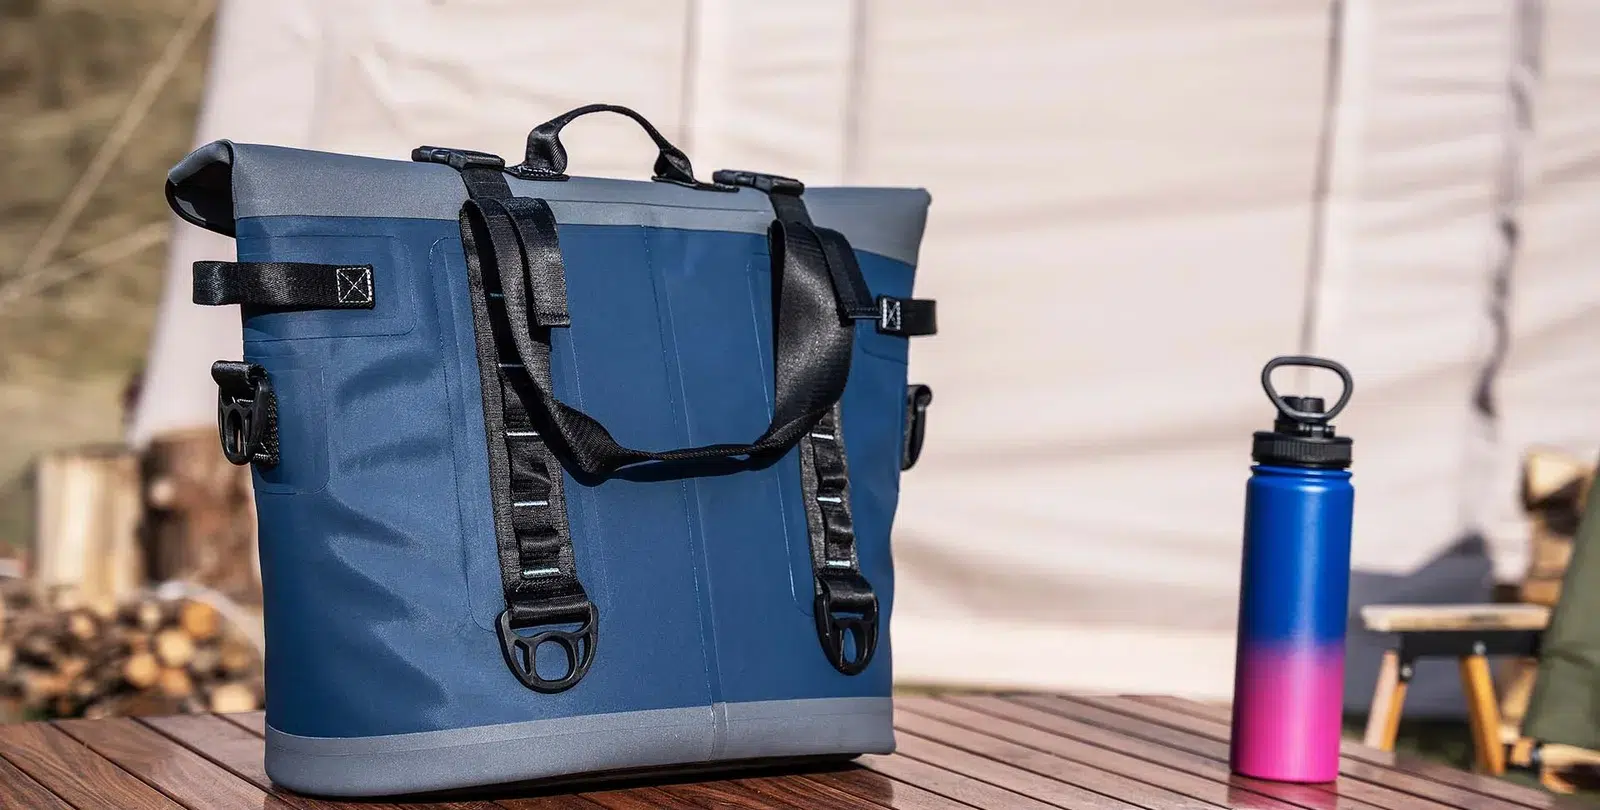
Packing your pvc ice box the right way makes a huge difference. You keep food and drinks fresh, cut down on mess, and save time during your trip. Want your snacks to last longer? Take a look at how freshness compares:
| Packing Method | Freshness Duration |
|---|---|
| Cooler Bag | About 24 hours |
| Cooler Box | Up to 5-7 days |
With smart packing, your cooler helps you enjoy cold drinks and tasty food for days. Try a few simple tricks, and you’ll notice the results right away.
Key Takeaways
- Pre-chill your PVC ice box and food items to keep everything cold longer. This simple step helps ice last and maintains freshness.
- Use the right containers to prevent leaks and keep food organized. Leak-proof and insulated containers help maintain cold temperatures.
- Layer ice strategically: start with block ice at the bottom, add cubed ice around food, and use dry ice for extra cooling when needed.
- Separate raw and ready-to-eat foods to avoid cross-contamination. Use leak-proof bags for raw items and keep them at the bottom of the cooler.
- Minimize lid openings to retain cold air. Plan ahead to grab everything you need at once, keeping your cooler closed as much as possible.
Prepping Your PVC Ice Box and Cooler Items
Pre-chilling the pvc ice box
You want your cooler to keep things cold as long as possible. Pre-chilling makes a big difference. When you chill your pvc ice box before packing, you lower its internal temperature. This step helps your ice last longer and keeps your food fresh. You can use ice packs or store your cooler in a cool spot overnight. If you skip this step, your cooler has to work harder to cool down, and your ice melts faster. Pre-chilling reduces heat transfer from the outside, so your food stays cold for hours.
Here’s a quick tip:
Put a few ice packs inside your cooler for a couple of hours before you pack it. Remove them right before you load your food and drinks.
Freezing and chilling food and drinks before packing
You want your food and drinks to stay cold, so start by freezing or chilling them before you pack. Cold items help your cooler work better. If you pack warm food, it melts your ice faster and raises the temperature inside. Freeze meats, chill drinks, and cool down snacks before you load them. This step helps with preservation and keeps everything safe to eat.
Try this simple checklist:
- Freeze meats and seafood overnight.
- Chill drinks in the fridge for a few hours.
- Cool down fruits, veggies, and snacks before packing.
- Pack cold items together for better cooling.
Choosing containers and packaging for your cooler
The right containers make packing easier and keep your cooler clean. Leak-proof containers stop spills and keep your food fresh. Insulated containers help maintain cold temperatures. You want airtight lids to prevent temperature changes and contamination. Some containers have special slots for ice packs, which help cool everything evenly.
Check out this table for features to look for:
| Feature | Description |
|---|---|
| Material | Durable, insulated materials like HDPE or PP with PU foam insulation. |
| Temperature Maintenance | Keeps food between 2°C and 8°C for up to 12-24 hours. |
| Lid Design | Secure, airtight lids prevent temperature swings and contamination. |
| Ice Pack Compartments | Multiple slots for ice packs or PCMs for even cooling. |
| Sealing Mechanism | Airtight lids with strong latches keep food safe and cold. |
If you use the right containers, you avoid leaks and keep your cooler organized. Your food stays fresh, and you spend less time cleaning up after your trip.
Selecting the best ice types: block, cubed, dry ice, and KUER options
Choosing the right ice for your PVC ice box can make your trip easier and keep your food fresh longer. You have a few options, and each one works best in different situations. Let’s break down the choices so you can pick what fits your needs.
1. Block Ice
Block ice stays cold for a long time. You get bigger chunks that melt slower than small pieces. If you want to keep things cold for days, block ice is your best friend. You can buy it at most stores or make your own by freezing water in containers. Place block ice at the bottom of your PVC ice box. Stack your food and drinks on top. This method helps with ice preservation and keeps everything chilled.
Tip: Freeze water in empty milk jugs or food-safe containers to make your own block ice at home.
2. Cubed Ice
Cubed ice cools things quickly. You get small pieces that fill gaps between food and drinks. If you want fast cooling, cubed ice works well. It melts faster than block ice, so you may need to add more during your trip. Use cubed ice to surround items or fill spaces in your cooler. You can mix cubed ice with block ice for better results.
Here’s a quick table to compare block and cubed ice:
| Ice Type | Cooling Speed | Melting Rate | Best Use |
|---|---|---|---|
| Block Ice | Slow | Slow | Long trips, base layer |
| Cubed Ice | Fast | Fast | Quick cooling, filling gaps |
3. Dry Ice
Dry ice is super cold. You can use it for longer trips or when you need to freeze items. Dry ice keeps your PVC ice box colder than regular ice. Handle dry ice with care. Always wear gloves and keep it away from bare skin. Place dry ice on top of your food, not underneath. This helps the cold air move down and keeps everything frozen.
Note: Never store dry ice in an airtight cooler. It releases gas and needs room to escape.
4. KUER Ice Box Options
KUER ice boxes work well with all types of ice. You get strong insulation and smart design. KUER coolers hold block ice, cubed ice, and even dry ice. Some models have special compartments for ice packs. You can use reusable ice packs for less mess and easy cleaning. KUER ice boxes help you keep food and drinks cold for days. If you want the best results, try mixing block ice and cubed ice in your KUER cooler.
Here’s a simple checklist for packing ice in your PVC ice box:
- Start with block ice at the bottom.
- Add cubed ice to fill gaps.
- Use dry ice for freezing needs.
- Try KUER ice packs for extra cooling.
- Keep your cooler closed as much as possible.
If you use the right ice, you get better cooling and less hassle. Your food stays fresh, and your drinks stay cold. You spend less time worrying and more time enjoying your trip. 🧊
How to Pack a Cooler for Maximum Efficiency
Strategic placement of ice in your pvc ice box
You want your cooler to stay cold for as long as possible. The way you place ice inside makes a big difference. Start by following the 2:1 ratio—use twice as much ice as the amount of food and drinks you pack. This method helps your cooler hold cold temperatures longer and boosts preservation.
Here’s how you can get the best results:
- Pre-chill your cooler and all items before packing. Cold items help ice last longer.
- Put block ice at the bottom. Block ice melts slowly and keeps the base cold.
- Add cubed ice or ice packs around and on top of your food. Cubed ice fills gaps and cools quickly.
- If you need extra cold, add dry ice or reusable ice packs. These keep everything colder for longer.
- Protect your ice by organizing items so they don’t trap heat. More ice means better cooling distribution.
Tip: Always keep your cooler closed when you’re not using it. Every time you open the lid, warm air gets in and melts your ice faster.
Arranging food and drinks for easy access
Packing your cooler the right way saves you time and keeps your food safe. You want to grab what you need without digging through everything. Smart arrangement also helps keep temperatures steady, which is important for food safety.
Try these steps for easy access and better cooling:
- Use resealable containers for all your food. This keeps things organized and easy to grab.
- Chill your cooler with a bag of ice before you start packing.
- Don’t overfill your cooler. Leave space for air to move around. Good air flow helps ice last longer.
- Layer your food based on how cold it needs to be. Put raw meat and seafood at the bottom, where it’s coldest. Place vegetables and snacks on top.
- Keep drinks separate from perishable foods. This prevents cross-contamination and makes it easier to find what you want.
- Use block ice for durability. If you want to lower the freezing temperature, sprinkle a little salt on the ice.
- Chill packed food overnight before your trip. Cold food helps your cooler work better.
- For longer trips, mix ice cubes with block ice or use reusable cooler packs.
- Carry an extra cooler if you need more space or want to separate items.
Note: Stable temperatures inside your cooler help prevent bacterial growth. This is especially important for meat, dairy, and fish. Keeping things cold keeps your food safe to eat.
Using dividers, bags, and containers in your cooler
Dividers, bags, and containers make cooler packing easier and cleaner. You want to keep everything separated to avoid leaks and messes. Using these tools also helps with food preservation and safety.
Here’s what works best:
- Use tightly sealed bags for raw meat, poultry, and seafood. Store these at the bottom of your cooler to prevent leaks onto other foods.
- Keep ready-to-eat items in separate containers. This stops cross-contamination and keeps allergens away from sensitive foods.
- Place drinks in one section and food in another. Dividers help you organize your cooler and make things easy to find.
- Choose leak-proof containers for sauces, dips, and snacks. This keeps your cooler clean and prevents spills.
- Pack everything in layers. Start with ice, then add containers and bags. Fill gaps with cubed ice or ice packs.
Callout: Mixing raw and ready-to-eat foods can cause foodborne illnesses and allergic reactions. Always keep them separated in your cooler.
A well-packed cooler keeps your food fresh, your drinks cold, and your trip stress-free. You spend less time searching and more time enjoying your adventure. 🥪🥤
Separating raw and ready-to-eat items in the pvc ice box
Keeping raw and ready-to-eat items apart in your cooler is super important. You want to avoid cross-contamination and keep your food safe. When you pack your pvc ice box, you need a plan. Raw meat, poultry, and seafood can carry bacteria. If these touch snacks or cooked food, you risk getting sick. You can stop this by using smart packing tricks.
Let’s break it down:
Why Separation Matters
Raw food like chicken or fish can leak juices. These juices might spread germs. Ready-to-eat food, like sandwiches or fruit, doesn’t get cooked again. If germs reach these items, you can’t kill them by heating. You want to keep everything safe for your trip.
How to Separate Items in Your Cooler
You can use these steps to organize your cooler:
-
Pack raw food in leak-proof bags or containers.
Place these at the bottom of your cooler. Gravity helps keep any leaks away from other items. -
Use a divider or tray.
Some coolers come with built-in dividers. If yours doesn’t, you can use a cutting board or a plastic tray. This keeps raw food away from snacks and drinks. -
Store ready-to-eat food on top.
Put sandwiches, fruit, cheese, and cooked meals above the raw items. You can grab these quickly without touching raw food. -
Label your containers.
Write “raw” or “ready” on each container. You won’t mix things up when you reach into your cooler. -
Keep drinks in a separate section.
Drinks don’t need to be near food. You can use a small basket or bag for bottles and cans.
Here’s a simple table to help you organize your cooler:
| Item Type | Container Type | Cooler Placement | Extra Tip |
|---|---|---|---|
| Raw meat/fish | Leak-proof bag | Bottom | Double-bag for safety |
| Ready-to-eat food | Airtight container | Top | Use a tray for stacking |
| Drinks | Basket/bag | Side or corner | Chill before packing |
Tip: Always wash your hands after handling raw food. Use hand sanitizer if you’re outdoors.
Extra Safety Tips for Your Cooler
- Check your cooler often. If you see leaks, clean them up right away.
- Use ice packs between layers. This keeps food cold and adds a barrier.
- Don’t open your cooler too much. Warm air can make food spoil faster.
- If you have two coolers, use one for raw food and one for snacks and drinks. This makes things even safer.
Packing your cooler with care means you get to enjoy your trip without worries. You keep your food fresh, your drinks cold, and everyone healthy. 😊
Maximizing Cold Retention in Your PVC Ice Box
Covering contents with towels or internal covers
You want your ice to last as long as possible. One easy trick is to cover everything inside your cooler with a towel or an internal cover. This extra layer helps trap the cold air and blocks warm air from sneaking in. You can use a clean towel, a blanket, or even newspaper. Fill any empty spaces with these materials. Less empty space means less air movement, which helps with ice preservation. When you pack your pvc ice box full, you slow down melting and keep your food cold for longer. This method works well for both short and long trips.
Keeping the cooler in shade for longer cooling
Where you place your cooler matters a lot. Always keep your cooler in the shade. Direct sunlight heats up the outside and melts your ice faster. If you can, put your cooler under a tree, inside a tent, or even in your car’s cabin. Shade helps your insulation work better and boosts ice preservation. You can also drape a towel or blanket over the top for extra protection. Remember, the cooler the outside, the longer your ice will last. This simple step makes a big difference, especially on hot days.
Minimizing lid openings to retain cold
Every time you open the lid, warm air rushes in and cold air escapes. Try to open your cooler only when you really need something. Plan ahead and grab everything you need in one go. Keeping the lid closed helps your ice last longer and keeps your food safe. Make sure the gasket on your cooler seals tight. A good seal stops air leaks and helps with preservation. You can also keep drinks and snacks in a separate cooler to avoid opening the main one too often.
Tip: Retain meltwater inside your cooler. The cold water helps keep everything chilled and slows down the melting of the remaining ice.
If you follow these steps, you get better ice preservation and enjoy cold food and drinks for days. Smart packing and good habits make your trips easier and more fun.
Using block ice or dry ice for extended cooling in your pvc ice box
Want your food and drinks to stay cold for days? You can use block ice or dry ice to get the best results in your pvc ice box. Block ice works great for long trips. It melts slower than regular ice cubes. You can make block ice at home by freezing water in large containers. When you pack your cooler, put block ice at the bottom. This helps with ice preservation and keeps everything cold.
Dry ice is even colder than regular ice. You can use dry ice if you need to freeze items or keep things super cold. Always handle dry ice with gloves. Never touch it with bare hands. Place dry ice on top of your food. Cold air sinks, so this helps with ice preservation. Dry ice lasts longer than regular ice, but you need to leave a little space in your cooler for the gas to escape.
Here’s a quick table to help you choose:
| Type | Cooling Power | Melting Speed | Best Use |
|---|---|---|---|
| Block Ice | High | Slow | Long trips |
| Dry Ice | Very High | Very Slow | Freezing, multi-day |
You can mix block ice and dry ice for extra cooling. Start with block ice at the bottom, then add dry ice on top. This combo keeps your food cold and your drinks icy. If you want less mess, use reusable ice packs with your block ice.
Tip: Always keep your pvc ice box closed as much as possible. This helps your ice last longer and keeps everything fresh.
If you follow these steps, you get better ice preservation and enjoy cold snacks for days. You spend less time worrying about melted ice and more time having fun. 🧊
Special Tips for Longer Trips and Unique Cooler Situations
Rotating ice and items for multi-day use
If you plan a trip that lasts several days, you need to keep your cooler working hard. Rotating ice and items helps you keep everything cold and fresh. Start by checking your cooler each morning. Move the coldest ice blocks to the top and shift any melting ice to the bottom. This keeps cold air moving over your food. If you have extra ice packs, swap them out every day. You can also move drinks and snacks around to make sure the cold reaches every corner. This simple routine helps with ice preservation and keeps your food safe. You get better results if you keep your cooler packed tight and avoid leaving empty spaces.
Tip: Freeze water bottles before your trip. Use them as ice packs, then drink them as they melt.
Using extra coolers for separation and efficiency
Bringing more than one cooler can make your trip easier and safer. You can use one cooler for drinks and another for food. This helps you keep raw meats away from ready-to-eat snacks. You also avoid cross-contamination. When you open the drink cooler often, you don’t let warm air into the food cooler. This keeps your food cold for a longer time. You get better preservation and less mess. Here are some ways extra coolers help:
- You separate drinks from food, which keeps everything organized.
- You reduce the risk of contamination by keeping raw meats apart from prepared foods.
- You keep food cool longer because you don’t open the food cooler as much.
- You make it easier to find what you need without digging through everything.
If you travel with a group, you can assign each cooler a job. One for snacks, one for drinks, and one for raw food. This system saves time and keeps everyone happy.
Utilizing natural resources like creeks and streams
Sometimes you camp near a creek or stream. You can use these natural resources to help keep your cooler cold. Place your cooler in the shade near the water. If the water is cold, you can set your cooler in the stream for a few hours. The moving water helps lower the temperature inside. You can also use wet towels from the creek to cover your cooler. This adds another layer of cooling. Make sure your cooler is sealed tight so water doesn’t get inside. You get extra help with ice preservation and keep your food fresh.
Note: Always check the area for safety before placing your cooler in a stream. Secure it so it doesn’t float away!
If you follow these tips, you make your cooler last longer and keep your food safe. You enjoy cold drinks and snacks every day of your trip.
Packing emergency supplies and backups in your pvc ice box
When you head out on an adventure, you never know what might happen. Packing emergency supplies and backups in your PVC ice box gives you peace of mind. You stay ready for anything, from a scraped knee to a sudden change in weather. Let’s make sure you have what you need.
Must-Have Emergency Items for Your Cooler:
- First Aid Kit: Always pack a small kit with bandages, antiseptic wipes, and pain relievers. You can handle cuts, scrapes, or headaches right away.
- Extra Water: Bring sealed water bottles. If you run out of drinks or need to clean a wound, you have a backup.
- Non-Perishable Snacks: Granola bars, nuts, or jerky last a long time. These snacks help if your main food runs out or gets wet.
- Medication: If you or someone in your group needs medicine, keep an extra dose in a waterproof bag.
- Flashlight or Headlamp: Sometimes you need light after dark. A small flashlight fits easily in your cooler.
- Multi-tool or Pocket Knife: You can open cans, cut rope, or fix gear with a good tool.
- Matches or a Lighter: If you need to start a fire, these come in handy. Keep them dry in a sealed bag.
Tip: Use a waterproof pouch or a sturdy container to keep your emergency items dry and easy to find.
Quick Reference Table:
| Emergency Item | Why You Need It | Storage Tip |
|---|---|---|
| First Aid Kit | Treat injuries | Top layer, easy access |
| Water Bottles | Hydration, cleaning | Side pocket or corner |
| Snacks | Energy boost | Separate bag or box |
| Medication | Health and safety | Waterproof pouch |
| Flashlight | Light in the dark | Small container |
| Multi-tool | Repairs, food prep | Tool pocket or pouch |
| Matches/Lighter | Fire starting | Sealed plastic bag |
You can pack these items in a small bag or box inside your cooler. Place them on top or in a side compartment. This way, you grab them fast when you need them. Packing smart keeps you safe and ready for anything. 🚑
Recommended PVC Ice Box Products and Accessories
KUER ice boxes and cooler accessories
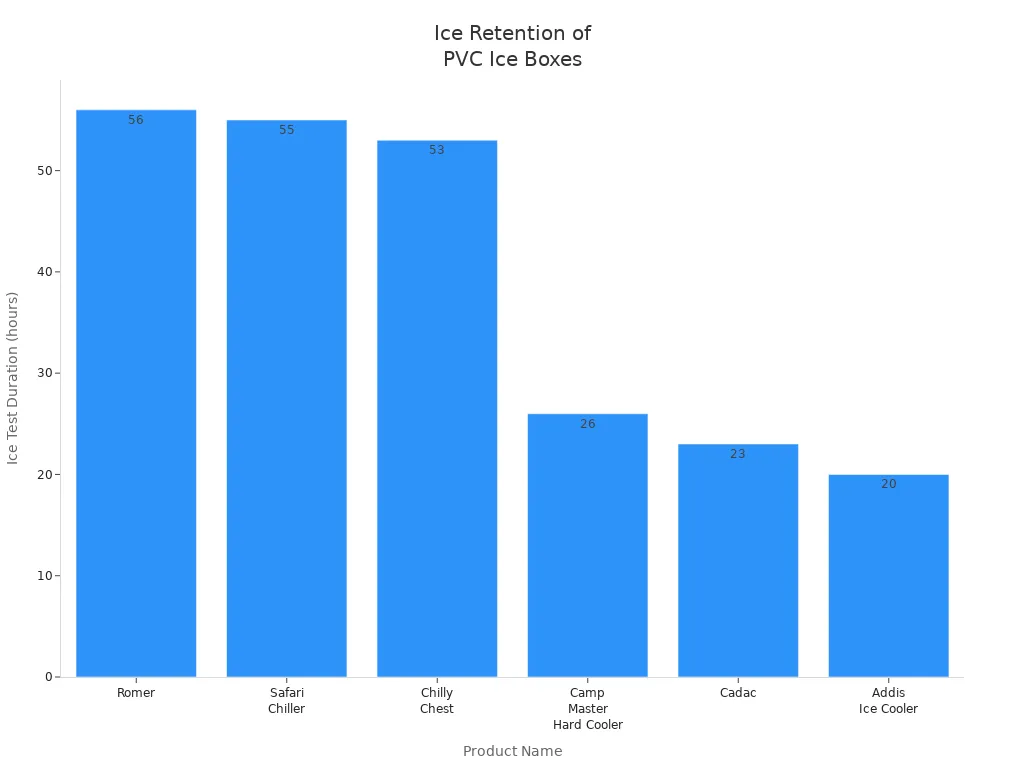
When you want a cooler that works hard and lasts long, KUER ice boxes stand out. These coolers use advanced rotomolded construction. This means you get strong walls and great insulation. Your ice can last 7 to 10 days, which is perfect for long trips. KUER coolers also have ergonomic handles and secure latches. You can carry them easily and trust that the lid stays shut. Many outdoor fans like KUER because you get premium features at a price 20-30% lower than many Western brands. You can even pick custom colors or sizes to fit your needs.
Let’s see how KUER compares with other top-rated coolers:
| Product Name | Ice Test Duration | Dimensions (cm) | Weight (kg) | Capacity (litres) | Price (R) |
|---|---|---|---|---|---|
| Four Day Coleman | Performed well | N/A | N/A | N/A | N/A |
| Romer | 56 hours | 76 x 43 x 48 | 12 | 65 | 1950 |
| Addis Ice Cooler | 20 hours | 58 x 35 x 40 | 4.6 | 45 | 499 |
| Safari Chiller | 55 hours | 62 x 42 x 36 | 9.5 | 45 | 1645 |
| Cadac | 23 hours | 57 x 34 x 35 | 5 | 45 | 449 |
| Chilly Chest | 53 hours | 59 x 44 x 43 | 10 | 50 | 1800 |
| Camp Master Hard Cooler | 26 hours | 58 x 35 x 40 | 4.9 | 45 | 449 |
Useful add-ons: thermometers, reusable ice packs, dry ice gloves, waterproof storage bags
You can make your cooler even better with the right accessories. Here are some top picks:
- Thermometers help you check the temperature inside your cooler. You always know if your food stays safe.
- Reusable ice packs like Cooler Shock or Yeti Ice keep things cold for over 24 hours. Gel-based packs work best for long trips. Hard packs last longer but may not fit in every cooler.
- Dry ice gloves protect your hands when you use dry ice. These gloves have special insulation and grip, so you stay safe from burns.
- Waterproof storage bags keep your snacks and gear dry. You can store medicine, matches, or even your phone without worry.
Here’s a quick table for some popular add-ons:
| Product Name | Price | Description |
|---|---|---|
| Cooler Shock Reusable Ice Packs | $30 | Long-lasting cold, stays frozen over 24 hours |
| Yeti Ice Refreezable Reusable Cooler Pack | $15 | Durable, great for repeated use |
| Arctic Ice Chillin’ Brew Extra Large Pack | $17 | Best for big coolers, keeps things cold for a long time |
| Igloo Maxcold Ice Block | $4 | Good for small coolers, budget-friendly |
Tip: Layer your ice packs in the cooler for the best results. Always use gloves when handling dry ice.
You can turn any trip into a cool adventure with the right cooler and accessories!
You can pack your pvc ice box like a pro with a few simple steps. Here are the most important tips:
- Insulate your food with quality containers.
- Layer ice and food for even cooling.
- Leave space for air to move.
- Check the temperature often.
- Open the lid only when needed.
- Use dry ice for long trips.
Before you go, check these off your list:
- Clean your cooler.
- Chill everything before packing.
- Use solid ice at the bottom.
- Label your food and drinks.
Try these tips and enjoy fresh food and cold drinks on every adventure!
FAQ
How long will ice last in my PVC ice box?
You can expect ice to last anywhere from 3 to 7 days. The exact time depends on how well you pack your cooler, the type of ice you use, and how often you open the lid.
Can I use dry ice in a KUER PVC ice box?
Yes, you can use dry ice in your KUER cooler. Always wear gloves when handling dry ice. Leave a small gap for gas to escape. Dry ice keeps things colder for longer trips.
What should I do if my cooler starts to leak?
Check the drain plug and seals. Make sure everything is tight. If you spot a crack, use waterproof tape as a quick fix. Keep your cooler upright to prevent spills until you can repair it.
How do I clean my PVC ice box after a trip?
Empty your cooler and rinse it with warm water. Use mild soap and a soft sponge. Dry it with a towel or let it air dry with the lid open. This keeps your cooler fresh and odor-free.
Is it safe to store food directly on ice?
You can put drinks right on ice, but always keep food in sealed containers or bags. This stops water from getting in and keeps your food safe to eat. Use a tray or divider for extra protection.


 Request a quote