You want your food and drinks to stay fresh and dry in your cooler, right? A leak proof ice bag for cooler works wonders for this. All you need is a few simple items from your kitchen. Grab two Ziploc freezer bags and mix water with a bit of rubbing alcohol. This easy diy trick helps you make a leak proof ice bag for cooler that keeps everything cold without any mess. No more soggy sandwiches or puddles at the bottom!
Key Takeaways
- Use thick freezer bags and double-bag your ice packs to prevent leaks and keep your cooler dry.
- Mix two parts water with one part rubbing alcohol to make flexible, slushy ice packs that fit around your food.
- Freeze your ice bags flat and label them for easy use and better stacking in your cooler.
- Pack your cooler smartly by placing ice packs at the bottom and top, keeping the lid closed to keep things cold longer.
- Check your ice bags for leaks before freezing and replace any damaged bags to avoid messes.
What You’ll Need for a Leak Proof Ice Bag for Cooler
Common Household Materials
You probably have most of what you need right at home. Here’s a quick list to get you started:
- Ziploc freezer bags (thicker ones work best)
- Water
- Rubbing alcohol (helps keep the ice slushy and flexible)
- A measuring cup
- A spoon for mixing
If you want to make your ice bag extra strong, look for bags made with polyester and a PVC lining. These materials are flexible and tough. Some bags use silicone seals to keep the cap tight and stop leaks. Wide-mouth caps with screw-top lids work better than zippers for a secure closure. Strong stitching helps the bag last longer and keeps it from tearing.
Tip: Double-bagging your ice pack adds another layer of protection against leaks.
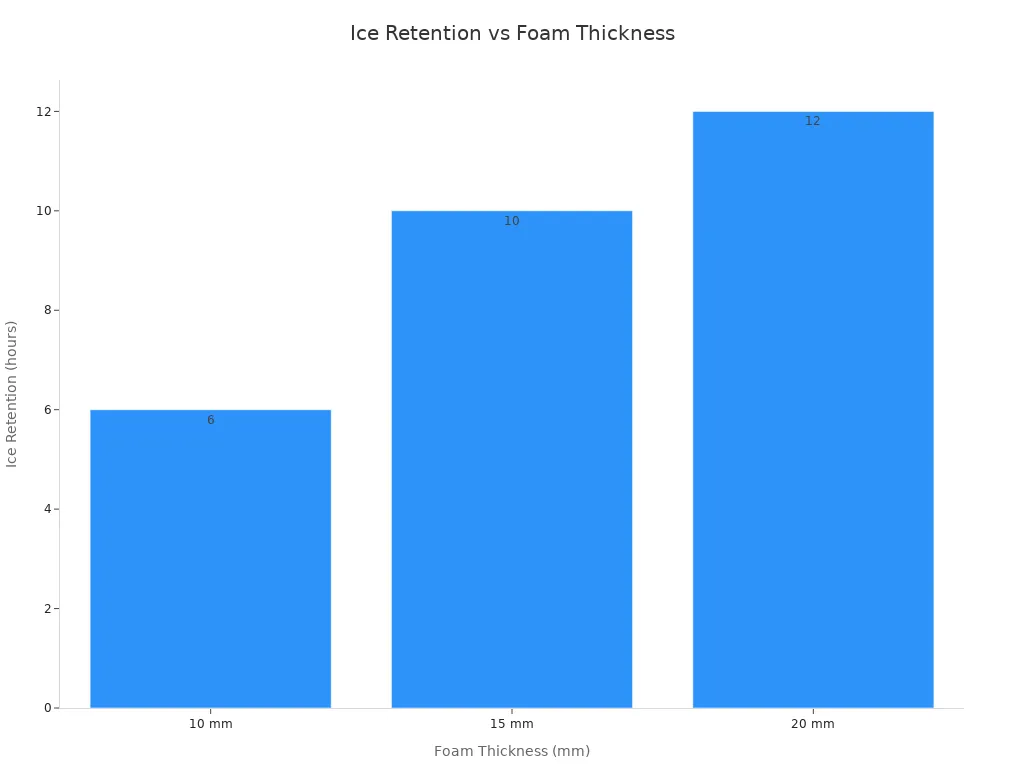
You can also check the thickness of your freezer bags. Bags with 10–20 mm of closed-cell foam or cross-linked XPE foam give better insulation and help keep your cooler dry. Heat-welded seams are important because they stop leaks at the edges. Liners made from TPU or PEVA are food-safe and easy to clean.
| Feature | Details / Recommendation |
|---|---|
| Foam Thickness | 10–20 mm closed-cell PE or XPE foam |
| Seam Construction | Heat-welded seams |
| Inner Liner | TPU/PEVA, food-grade and leakproof |
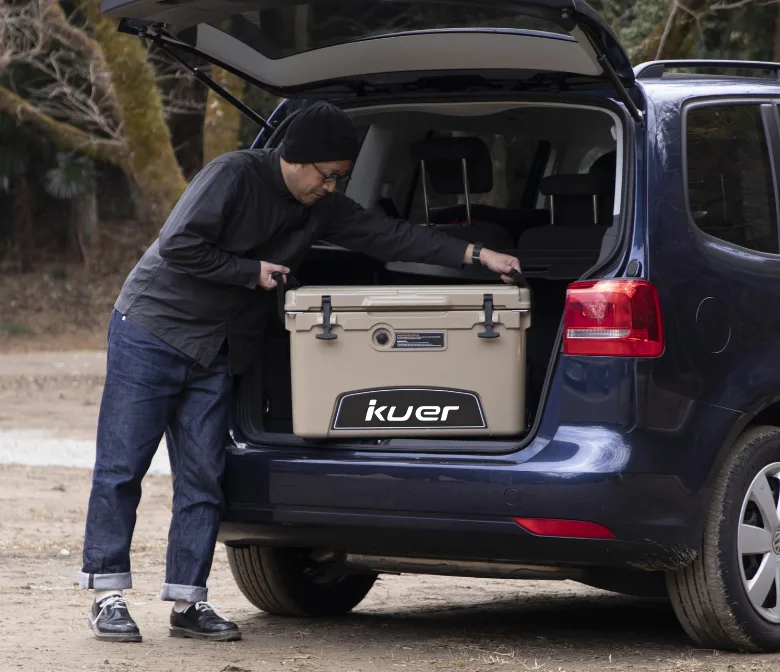
Recommended Products Including KUER
If you want to try ready-made options, you have lots of choices. KUER offers a wide range of coolers and accessories that help you keep things cold and dry. Here are some popular products you can use with your homemade or store-bought leak proof ice bag for cooler:
- Rotomould Cooler Boxes (great for camping and fishing)
- Injection Coolers
- Blow Moulded Coolers
- Cooler Bags
- Ice Buckets
- Accessories like custom ice chest coolers and soft coolers
Here’s a quick look at some top cooler models and how long they keep ice cold:
| Cooler Model | Price | Warranty | Capacity (quart) | Ice Retention (hours) |
|---|---|---|---|---|
| Yeti 48 Wheeled Cooler | $400 | 5 years | 48 | 62 |
| Magellan Outdoors Pro Explore Icebox | $200 | 1 year | 45 | 73 |
| RovR RollR 45 | $350 | 1 year | 45 | 69 |
| Brumate Brutank 35-Quart Rolling | $325 | 5 years | 35 | 77 |
| Rtic 52-QT Ultra-Light Cooler | $200 | 3 years | 52 | 55 |
| Coleman 50-Quart Xtreme Hard Cooler | $65 | 1 year | 50 | 40 |
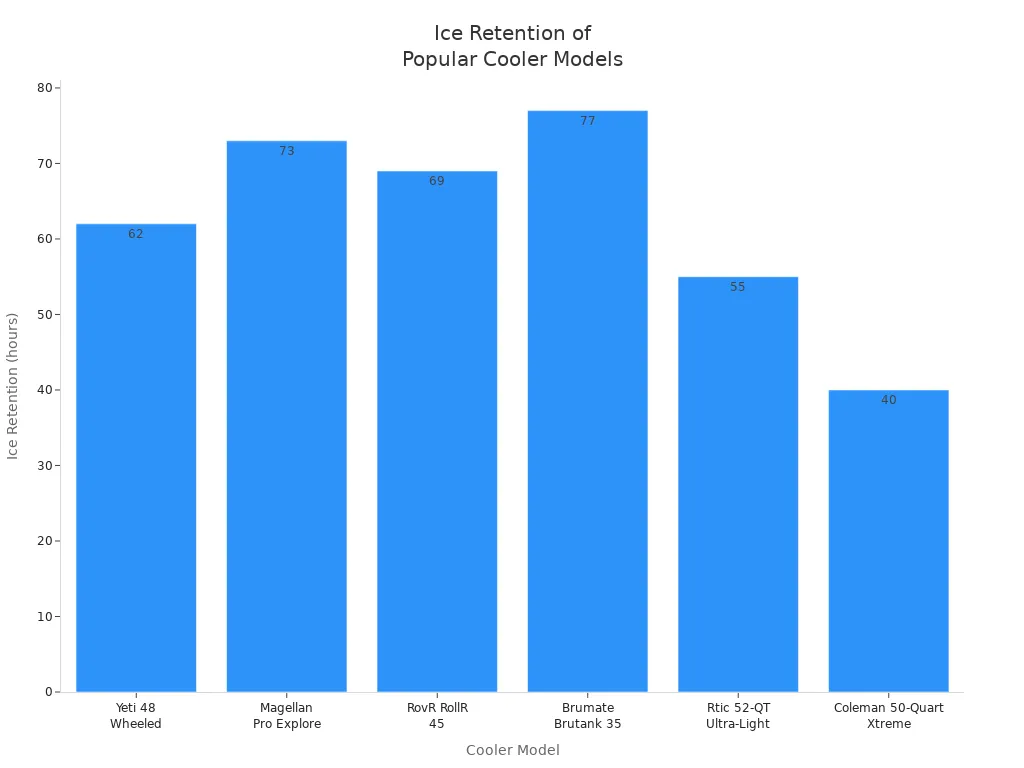
Note: Pre-chill your cooler and use a mix of block ice and ice packs for the best results. Keep the lid closed as much as possible to lock in the cold.
Step-by-Step Guide to DIY Ice Packs
Preparing Your Bags
Getting your bags ready is the first step to making a leak proof ice bag for cooler. You want to keep everything inside your cooler dry and safe. Here’s how you can prepare:
- Pick freezer-grade plastic bags with double zippers. These bags seal tightly and help stop leaks.
- If you have screw-top containers, you can use those for liquids. They work well for keeping things sealed.
- For block ice, freeze water in reusable containers or baking dishes. Try to make blocks about two inches thick. They fit nicely at the bottom of your cooler.
- Use reusable ice packs if you have them. Hard packs last longer, while soft packs can fit around your food.
- Grab a permanent marker and label each bag or container. This helps you find what you need fast.
- Prepare your cooler items a day before your trip. Make sure everything is sealed and frozen.
- Wrap all your food tightly. This keeps it safe from melted ice or spills.
Tip: Stack your bags and containers neatly in the cooler. This keeps them from getting squished and helps the seals stay tight.
Mixing and Filling
Now it’s time to make the magic mixture for your diy ice packs. This mix stays slushy and flexible, so it fits around your food and drinks.
- Measure out 2 cups of water and pour it into a bowl.
- Add 1 cup of rubbing alcohol (or vodka if you prefer). The alcohol keeps the mixture from freezing solid.
- Stir the mixture well with a spoon.
- Pour the mix into your prepared freezer bag. Don’t fill it all the way—leave some space so the bag can move and flex.
- Squeeze out as much air as you can before sealing the bag.
Here’s a quick table for the perfect mix:
| Ingredient | Amount |
|---|---|
| Water | 2 cups |
| Rubbing Alcohol | 1 cup |
Note: This 2:1 ratio gives you a slushy, flexible ice pack that won’t freeze into a hard block.
Sealing and Double-Bagging
You want your diy ice packs to stay leak-free, even after hours in the cooler. Double-bagging is the secret.
- Seal the first bag tightly. Make sure the zipper or seal is closed all the way.
- Place the sealed bag inside a second freezer bag. This adds an extra layer of protection.
- Press out any air from the second bag and seal it shut.
- Lay the double-bagged pack flat in your freezer. Let it freeze overnight for best results.
Pro Tip: Always check for leaks before you freeze. Hold the bag upside down and gently squeeze. If you see any drips, start over with a new bag.
Once frozen, your leak proof ice bag for cooler is ready to use. Just pop it in your cooler with your food and drinks. You’ll keep everything cold and dry, and you won’t have to worry about soggy sandwiches or puddles at the bottom. Making your own diy ice packs is quick, easy, and saves you money.
Freezing and Using in Your Cooler
You have your double-bagged ice packs ready. Now it’s time to freeze them and get the most out of your homemade solution. Here’s how you can do it step by step:
- Lay your ice bags flat in the freezer. This helps them freeze evenly and makes them easier to stack later.
- Give your packs plenty of space. If you stack them on top of each other, they might not freeze all the way through.
- Let them freeze overnight. You want them to be as cold as possible before you use them.
Tip: If you need your ice packs to freeze faster, spread them out on a baking sheet. Cold air can reach every side that way.
When you’re ready to pack your cooler, grab your frozen ice bags. Place them at the bottom first. Cold air sinks, so this keeps everything above nice and chilly. If you have more than one ice bag, put some on top of your food and drinks too. This creates a cold zone all around your items.
You can use your homemade ice packs with any type of cooler. They work great for picnics, road trips, or even a day at the beach. If you want to keep things cold for longer, try these quick tricks:
- Pre-chill your cooler with a bag of ice before you pack it.
- Keep the lid closed as much as you can.
- Fill empty spaces with towels or extra ice packs. This stops warm air from getting in.
Note: Always check your ice bags for leaks before you put them in the cooler. If you spot any, swap them out for a new one.
Your leak proof ice bags will keep your food dry and your drinks cold. You won’t have to worry about melted ice making a mess. Enjoy your outing with a fresh and dry cooler every time! 🧊
Alternative DIY Ice Packs Methods
Looking for more ways to keep your cooler dry and your food cold? You have several creative options. Each method has its own strengths, especially when it comes to leak prevention.
Using Vacuum Seal Bags
Vacuum seal bags work great for making leak proof ice packs. You fill the bag with water, seal it tight, and freeze it. The thick plastic keeps water inside, even as the ice melts. Many people find that double-bagging adds extra protection. Some users have taken vacuum sealed ice blocks on five-day trips without any leaks. These bags are tough enough for pre-cooked meals, so they handle ice just as well. If you want a reliable solution, vacuum seal bags give you peace of mind for your next adventure.
Tip: Lay your vacuum sealed ice packs flat in the freezer. They freeze faster and stack better in your cooler.
Frozen Sponge in Ziploc Bag
This method is simple and mess-free. Take a clean sponge, soak it in water, and place it inside a Ziploc bag. Freeze the whole thing. When the ice melts, the sponge absorbs the water, so you don’t get puddles in your cooler. This trick works well for short trips or lunch boxes. You can reuse the sponge again and again. It’s a smart diy hack for anyone who wants a quick fix.
Gel Packs and KUER Options
Gel packs stand out for their long-lasting cooling and leak-proof design. The thick, BPA-free plastic keeps the gel inside, so you don’t have to worry about spills. Some gel-pack brands, like Engel Ice, can keep things cold for up to 36 hours. Others, such as Cooler Shock, last between 18 and 26 hours. KUER recommends pre-chilling your cooler and ice packs to get the best results. Using several smaller gel packs helps keep everything colder for longer. Both gel and KUER options focus on strong, waterproof materials that prevent leaks and keep your food safe.
Here’s a quick comparison of popular diy ice pack methods:
| DIY Ice Pack Method | Materials Used | Preparation Method | Leak-Proof Capability and Notes |
|---|---|---|---|
| Rubbing Alcohol | Water + rubbing alcohol | Double-bag in freezer bags | Double-bagging helps prevent leaks |
| Dish Soap | Liquid dish soap | Double-bag in freezer bags | Double-bagging helps prevent leaks |
| Corn Syrup | Corn syrup | Double-bag in freezer bags | Double-bagging helps prevent leaks |
| Rice | Uncooked rice | Fill sock or pillowcase, tie closed | No liquid, so less risk of leaks |
| Saltwater | Water + salt | Double-bag in freezer bags | Similar leak-proof steps as others |
Note: Liquid-based packs need double-bagging for best leak prevention. Solid packs like rice don’t leak because there’s no liquid inside.
Tips for Leak Prevention and Maximum Cooling
Checking for Leaks Before Freezing
You want to make sure your homemade ice packs stay sealed. Before you freeze anything, check for leaks. Hold your filled bag upside down over the sink and give it a gentle squeeze. If you see any drips, grab a new bag and try again. Double-bagging adds extra protection. You can also wrap your ice pack in a thin towel to catch any moisture from condensation. This step keeps your cooler dry and your food safe.
Tip: Always check the seams and zipper of your bag. Even a tiny gap can cause a mess later.
Packing Your Cooler Efficiently
How you pack your cooler makes a big difference. Follow these steps to keep everything cold and leak-free:
- Place a block of ice or your leak proof ice bag for cooler at the bottom. This creates a cold base that melts slowly.
- Put perishable foods in the middle. Use airtight containers or zip-lock bags to stop leaks and keep things fresh.
- Add ready-to-eat snacks and delicate items on top. This way, you don’t have to dig through the cooler and let out cold air.
- Fill empty spaces with small items or extra ice packs. Less air means less heat sneaks in.
- Use watertight containers and drain melted water often. This keeps your cooler dry and prevents soggy food.
- Limit how often you open the lid. Every time you peek inside, warm air gets in and melts your ice faster.
Packing smart helps your food stay cold and your cooler stay mess-free.
Keeping Ice Bags Colder Longer
You can make your ice bags last longer with a few simple tricks. Mix rubbing alcohol and water for a flexible ice pack that molds around your food. Pre-chill your food and drinks before packing them. Layer ice packs at the bottom and top of your cooler to spread the cold evenly. Fill any gaps with extra ice packs or even crumpled newspaper. Keep your cooler out of the sun and open it only when you need something. For longer trips, use larger ice packs or try a homemade gel pack. Combining different types of ice packs, like saltwater and gel, can boost your cooling power.
Remember: Double-bag your homemade ice packs and wrap them in cloth to stop leaks and absorb condensation.
Making a leak proof ice bag for your cooler at home is quick and easy. You avoid soggy food and messy cleanups with homemade ice packs. Here are some common challenges you might face:
| Challenge | Explanation |
|---|---|
| Improper Sealing | Bags not closed tightly can leak. |
| Bag Damage | Tears or cracks let water escape. |
| Incorrect Packing | Overfilling bags can cause spills. |
When you use leak proof ice bags, you keep your food dry and your cooler clean.
- No more soggy snacks
- Less water pooling at the bottom
- Food stays fresh and organized
Try these tips and share your own ideas in the comments!
FAQ
How long do homemade ice bags stay cold in a cooler?
Most homemade ice bags keep things cold for 6–12 hours. If you use a good cooler and pre-chill your items, you can stretch that time even longer.
Can I reuse my DIY ice packs?
Yes! You can reuse your ice packs many times. Just check for leaks before each use. If you spot any damage, make a new one.
Is rubbing alcohol safe to use in ice packs?
Rubbing alcohol is safe inside sealed bags. It helps keep the ice slushy. Make sure you double-bag your packs so the alcohol never touches your food.
What should I do if my ice bag leaks?
If you notice a leak, toss the damaged bag and make a new one. Always double-bag your ice packs to help prevent leaks in the future.
Can I use salt instead of rubbing alcohol in my ice packs?
You can use salt to lower the freezing point of water. Mix salt with water, then freeze it in a double-bagged pack. This method works well for flexible ice packs.
 Request a quote