You want your hard sided lunch cooler to stay clean and fresh, right? Simple habits go a long way. When you take care of your cooler every day, you stop odors and stains before they start. Your cooler always stands ready for work, travel, or adventure. With regular care, your hard sided lunch cooler lasts longer and keeps your food cold every time.
Key Takeaways
- Clean your cooler after every use with mild soap and warm water to keep it fresh and safe.
- Do a deep clean weekly or monthly to remove hidden dirt, stains, and odors.
- Pre-chill your cooler and pack it with frozen items and block ice to keep food cold longer.
- Store your cooler dry and open to prevent mold, and protect it from heat by keeping it in the shade.
- Handle your cooler gently, avoid harsh chemicals, and dry it well to make it last for years.
Daily and Weekly Hard Sided Lunch Cooler Maintenance
Quick Daily Cleaning Steps
You want your cooler ready for action every day. Daily cleaning only takes a few minutes and keeps your food safe and fresh. Here’s a simple routine you can follow:
- Mix warm water with a little mild dish soap.
- Grab a soft towel or sponge and wipe down the inside and outside of your cooler.
- Rinse everything with clean water to get rid of any soap.
- Dry the cooler with a clean towel.
- Leave the lid open for a few hours so it can air dry completely.
You can do this right after unpacking your lunch or while you get ready for the next day. If you use your hard sided lunch cooler every day, make this part of your evening routine. For occasional use, clean it before and after each trip. Avoid soaking the cooler in water or using harsh chemicals. This protects the seals and insulation, so your cooler stays in top shape.
Tip: Daily cleaning usually takes just a few minutes, especially if you do it right after use. Quick wipes and a short drying time keep your cooler fresh and ready for the next meal.
Weekly Deep Clean for Your Cooler
Even with daily care, your cooler needs a deeper clean once a week or at least once a month if you use it less often. This helps remove any hidden dirt, stains, or smells.
- Fill a sink or basin with warm water and a small amount of mild detergent.
- Use a sponge or soft cloth to scrub the inside and outside of the cooler.
- Pay extra attention to corners, lid seals, and any removable parts.
- Rinse everything well with clean water.
- Dry the cooler with a towel, then leave it open and upside down to air dry completely.
- For extra freshness, spray a mix of equal parts vinegar and water inside the cooler. Let it sit for a few minutes, then wipe and rinse.
- If you notice stubborn odors, make a paste with baking soda and water. Spread it on the problem spots, wait 15-20 minutes, then rinse and dry.
You can also spot clean between deep cleans with antibacterial wipes or natural cleaners. This keeps your cooler looking and smelling great.
Odor Prevention and Removal
No one likes a smelly cooler. You can stop odors before they start with a few easy habits:
- Always clean your cooler after each use, especially the rubber gasket around the lid. This spot can trap food bits and moisture.
- Store your cooler with the lid slightly open. Air can move through and prevent mildew or musty smells.
- For a natural fresh scent, wipe the inside with lemon juice or a little vanilla extract.
- If you notice a strong odor, use a diluted bleach solution. Wipe the inside carefully, rinse well, and let it dry.
- Dry your cooler completely before storing it. Moisture leads to bad smells and even mold.
- If you use your cooler for fish or other strong-smelling foods, clean it right away and let it air out longer.
Note: Baking soda works best for soft coolers, but you can still try it for mild odors in hard-sided models.
Keeping your cooler clean and dry is the best way to prevent odors. These simple steps help your cooler stay fresh and ready for your next adventure with ice-cold drinks and snacks.
Stain Removal for Hard Sided Lunch Coolers
Stains can sneak up on you, especially after a busy week of lunches or outdoor adventures. Some foods, like tomato sauce or curry, leave behind stubborn marks that regular soap and water just can’t handle. If you act fast, you can keep your hard sided lunch cooler looking new and smelling fresh.
Here’s a simple step-by-step guide to tackle stains without damaging your cooler:
-
Make a Baking Soda Paste
Mix one tablespoon of baking soda with one cup of water. Baking soda works as a gentle scrub that breaks down stains but won’t scratch the surface. -
Apply the Paste
Use a soft cloth or sponge to spread the paste over the stained area. Let it sit for 15–20 minutes. This gives the baking soda time to work its magic. -
Scrub Gently
After waiting, gently rub the spot with your cloth or a nylon non-abrasive pad. Avoid steel wool or harsh scrubbers, which can scratch the cooler. -
Rinse and Wash
Rinse the area with clean water. Wash with a little dish soap if needed, then rinse again to remove any leftover paste. -
Dry Thoroughly
Wipe the cooler dry with a towel or paper towel. Make sure it’s completely dry before you put it away. Moisture can cause new stains or even mold.
Tip: For really tough stains, try applying hand sanitizer directly to the spot. Let it sit for about an hour, then scrub gently and rinse well. Always test on a small area first to make sure it doesn’t discolor your cooler.
Some stains just don’t want to leave. Tomato-based sauces, food dyes, and mold can be especially stubborn. Vinegar helps with odors, but it doesn’t always remove stains. If you still see marks after cleaning, repeat the steps or try a little lemon juice as a last resort. Don’t forget—quick action is your best friend. The sooner you clean up a spill, the easier it is to keep your cooler spotless.
Note: Avoid bleach, steel wool, and abrasive cleaners. These can damage the surface and shorten the life of your cooler.
A clean hard sided lunch cooler not only looks better but also keeps your food safe and fresh. With these easy steps, you can handle stains and enjoy your cooler for years to come.
Maximize Ice Retention and Cooler Performance
Pre-Chilling Your Hard Sided Lunch Cooler
If you want your lunch to stay cold all day, start by pre-chilling your hard sided lunch cooler. This simple step can make a big difference in how long your ice lasts. When you pre-chill, you cool down the insulation and the inside walls. That way, your cooler does not steal the cold from your ice right away.
Take a look at how pre-chilling affects ice retention:
| Cooler Type | Ice Retention Without Pre-Chilling | Ice Retention With Pre-Chilling | Improvement in Ice Retention |
|---|---|---|---|
| Igloo Hard Cooler | 22 hours | 30 hours | +8 hours |
| YETI Hard Cooler | 60-72 hours | 82 hours | +10 to 22 hours |
| Cooler Bag (soft) | 8 hours | 8 hours | No improvement |
You can see that hard-sided coolers like Igloo and YETI keep ice cold much longer when you pre-chill them. Soft cooler bags do not get the same benefit.
Here’s how you can pre-chill your cooler for the best results:
- Place reusable ice packs or frozen water bottles inside your cooler a few hours before you need it.
- If you have extra time, fill the cooler with ice or cold water the night before.
- Right before you pack your cooler, dump out the pre-chill ice or water and add fresh ice.
Tip: Pre-chilling helps your cooler maintain a lower temperature, so your food and drinks stay colder for longer. If you skip this step, your ice will melt faster because the cooler walls start out warm.
How to Pack Your Cooler for Best Results
The way you pack your cooler matters just as much as the ice you use. If you want to maximize ice retention, follow these steps to keep everything cold and fresh:
- Freeze or chill your food and drinks before packing. Cold items help your cooler stay cold.
- Use block ice at the bottom. Block ice melts slower than cubes.
- Add crushed or cubed ice to fill gaps between items. This keeps cold air moving around your food.
- Place perishable foods, like meat and dairy, at the bottom near the ice.
- Layer food and ice. Alternate layers to keep everything cold.
- Use leakproof containers for food. This stops spills and keeps your cooler clean.
- Fill the cooler as much as possible. Less empty space means less warm air.
- Add extra insulation, like a foam pad or a damp towel, on top before closing the lid.
Note: Try to open your cooler only when you need something. Every time you open it, warm air gets in and melts the ice faster.
Managing Ice and Cold Packs
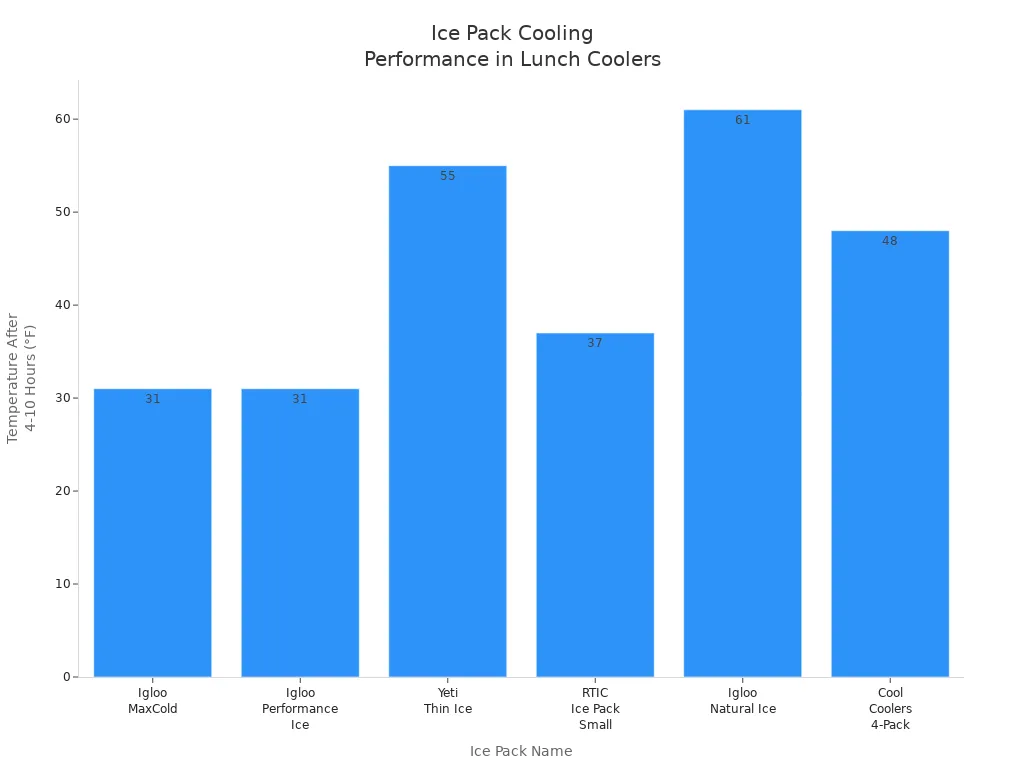
Choosing the right ice or cold packs can make your cooler work even better. Some ice packs last longer than others. Here’s a quick look at how different ice packs perform:
| Ice Pack Name | Starting Temp (°F) | Temp After 4 Hours (°F) | Cooling Duration Notes |
|---|---|---|---|
| Igloo MaxCold | 11 | 31 | Best value; keeps cold well |
| Igloo Performance Ice | 11 | 31 | Slightly better, but costs more |
| Yeti Thin Ice | -5 | 55 (after 10 hours) | Longest cooling duration |
| RTIC Ice Pack Small | 1 | 37 | Affordable, but melts sooner |
| Igloo Natural Ice | 3 | 61 | Flexible, but warms up faster |
| Cool Coolers 4-Pack | 1 | 48 | Small, stays cold for 4 hours |
To keep your cooler cold all day:
- Use large, well-insulated ice packs like Yeti Thin Ice or Igloo MaxCold for the longest cooling.
- Add more ice or cold packs as needed, especially if you notice the temperature rising.
- Place a thermometer inside your cooler. Make sure it stays at or below 40°F to keep food safe.
- Try not to open the cooler too often. Each time you do, you let in warm air.
- Keep your cooler in the shade or cover it with a towel to block the sun.
Tip: If you use your cooler for a long trip, check the ice and cold packs every few hours. Replace them when they start to melt or when the temperature goes above 40°F.
When you pack your cooler the right way and use the best ice packs, you get the most out of your cooler. You keep your food safe, drinks cold, and enjoy your day without worry.
Minimizing Heat Exposure
When you take your cooler outside, heat can sneak in from all directions. If you want your food and drinks to stay cold, you need to protect your cooler from the sun, hot air, and warm surfaces. Let’s look at what makes your cooler heat up and how you can stop it.
What Makes Your Cooler Heat Up?
- High air temperature can warm up your cooler fast.
- Humid days slow down cooling and make it harder for ice to last.
- The sun’s rays add extra heat, especially if your cooler sits in direct sunlight. Sunlight can raise the temperature inside by up to 15°F.
- Hot ground or pavement transfers heat right into the bottom of your cooler.
- Stagnant air traps heat and keeps your cooler from cooling down.
You can fight these heat sources with a few smart moves. Here’s how you can keep your cooler cold, even on the hottest days:
- Always look for shade. Place your cooler under a picnic table, tree, or even a car. Shade blocks the sun and keeps the outside cooler.
- Keep it covered. Drape a damp towel or a reflective blanket over the lid. This reflects heat and helps cool down your cooler.
- Never leave your cooler on hot pavement or sand. Set it on grass, a wooden deck, or even a folded blanket. This stops heat from the ground from sneaking in.
- Use reflective material like Reflectix on the lid. This bounces sunlight away and keeps the inside colder.
- Store your cooler inside your vehicle, not in a hot trunk or on the roof. The inside of a car is usually cooler than the trunk or roof, especially when parked in the shade.
- Fill your cooler all the way. Use ice packs, frozen water bottles, or even crumpled paper to fill empty spaces. Less air inside means less room for warm air to get in.
- Layer ice along the bottom and sides. This creates a cold barrier and protects your food from outside heat.
- Pack frozen food or drinks at the bottom. These act like extra ice blocks and help everything stay cold.
- Limit cooler access. Try to open the lid only when you really need something. Every time you open it, warm air rushes in and melts your ice faster.
Tip: If you want your cooler to last even longer, separate your food and drinks into different coolers. This way, you only open each one when you need it.
Here’s a quick table to help you remember the best ways to minimize heat exposure:
| Problem | What to Do |
|---|---|
| Direct sunlight | Find shade, use reflective cover |
| Hot ground | Place on grass or blanket |
| Empty space inside | Fill with ice packs or paper |
| Frequent opening | Limit cooler access |
| High outside temp | Store inside vehicle, not trunk |
When you use these tips, you help your ice last longer and keep your food safe. You don’t have to worry about melted snacks or warm drinks. Just a few simple steps can make a big difference, so you can enjoy your day without any cooler troubles.
Long-Term Hard Sided Lunch Cooler Care and Storage
Proper Drying After Each Use
After you clean your cooler, drying it the right way makes a big difference. Always air dry your cooler with the lid open before you put it away. This simple habit lets moisture escape and helps prevent mold and mildew from growing inside. You might not know exactly how long it takes for your cooler to dry, but leaving the lid open gives it plenty of time to air out. If you rush this step, you risk trapping moisture, which can lead to bad smells or even mold. So, after each use, wipe down any leftover water, then let your cooler sit open in a dry spot. You’ll keep your hard sided lunch cooler fresh and ready for your next adventure.
Tip: Place your cooler upside down with the lid open for faster drying.
Safe Storage Locations for Your Cooler
Where you store your cooler matters just as much as how you clean it. Some places can cause damage or make odors worse. Avoid airtight spaces like walk-in coolers or freezers, since these spots trap moisture and can lead to mold or mildew. Damaged doors or rapid temperature changes in storage areas can also cause condensation and spoilage. Instead, pick a dry, well-ventilated spot in your garage, pantry, or mudroom. Make sure the cooler is empty and dry before you store it. If you want extra protection, keep it covered with a clean towel to block dust and sunlight.
- Avoid storing in:
- Damp basements
- Enclosed sheds with poor airflow
- Direct sunlight or hot attics
Avoiding Damage and Misuse
You want your cooler to last for years, so treat it with care. Don’t overload it or drop it on hard surfaces. Check the lid and seals for cracks or wear. If you notice any issues, fix them right away to keep your cooler working well. Always limit cooler access—open it only when you need something. This keeps the inside cold and protects the seals from extra wear. When you take your cooler outside, keep it covered to shield it from the sun and heat. Never use harsh chemicals or abrasive pads when cleaning. Stick to gentle cleaners and soft cloths to protect the surface.
Remember: A little care goes a long way. Store your cooler properly, dry it well, and handle it gently to enjoy fresh, cold food and drinks every time.
Recommended Cleaning Products and Tools for Hard Sided Lunch Coolers
Safe Cleaners for Your Cooler
You want your lunch cooler to stay fresh and safe for your food. The best way to do this is by using gentle cleaners. Mild dish soap and warm water work well for everyday cleaning. If you need to tackle odors or bacteria, try a mix of water and vinegar. This solution helps remove smells without leaving harsh chemicals behind. For tough stains, a paste made from baking soda and water can help lift marks without scratching the surface. Always rinse your cooler well after using any cleaner, and let it air dry completely before storing it.
Tip: Avoid bleach or strong chemicals. These can damage the inside of your cooler and shorten its life.
Using KUER and Other Trusted Brands
When you choose a cooler, you want one that makes cleaning easy. KUER coolers stand out because of their smooth interiors and removable liners. These features let you wipe down surfaces quickly or take out parts for a deeper clean. You can empty water easily with KUER’s drain system, so you don’t have to tip the cooler. Other trusted brands like YETI, Engel, and Pelican also offer durable designs, but KUER focuses on making cleaning simple. No matter which brand you use, always wash removable compartments separately and check for any trapped food or moisture.
- Smooth interiors make wiping easy.
- Removable liners and compartments help with deep cleaning.
- Easy-to-use drain systems let you empty water without lifting.
- Regular cleaning after each use keeps odors away.
- Store your cooler in a cool, dry place for best results.
Essential Cleaning Tools
You don’t need fancy tools to keep your cooler in top shape. Experts suggest using a soft cloth or sponge for wiping down surfaces. These tools clean without scratching the plastic. For corners and tight spots, a small brush or old toothbrush works well. Always hand-wash your cooler—dishwashers and washing machines can damage it. After cleaning, let your cooler air dry with the lid open. This step helps prevent mold and keeps your cooler ready for your next adventure.
| Tool | Use |
|---|---|
| Soft cloth | Wiping inside and outside |
| Sponge | Gentle scrubbing |
| Small brush | Cleaning corners/seams |
| Old toothbrush | Spot cleaning tight areas |
Year-Round Hard Sided Lunch Cooler Care Checklist
Ready to keep your hard sided lunch cooler in top shape all year? Use this checklist to make sure you never miss a step. You can print it out or save it on your phone for quick reference. These habits help your cooler last longer and keep your food safe.
- Wash the inside and outside with mild soap and warm water before first use and after every trip.
- Tackle tough stains by making a baking soda and water paste. Rub it on the stain and rinse well.
- If you notice any odors, wipe the inside with a diluted bleach solution. For stubborn smells, leave a cloth soaked in vanilla extract inside overnight.
- Always air dry your cooler with the lid open. This stops mold and mildew from growing.
- Store your cooler in a dry, well-ventilated spot. Keep it away from open flames, chemicals, and strong cleaning agents.
- Never drag your cooler on the ground. Carry it or use the handles to prevent scratches and cracks.
- Limit water exposure. Don’t soak your cooler for more than four hours at a time.
- Some fading from sunlight is normal. This won’t affect how well your cooler works.
- Place your cooler on a towel if you need to set it on a hot surface. This protects the bottom from heat damage.
- Skip the microwave, dishwasher, and boiling water. Clean your cooler by hand for best results.
- Use plenty of ice when packing. Aim for a 2:1 ice-to-food ratio and fill all empty spaces.
- Choose well-cured ice that is dry and colder than the freezing point. This keeps your food and drinks colder for longer.
✅ Tip: Check your cooler after each use. Quick cleaning and drying make every adventure easier.
You can keep your hard sided lunch cooler in great shape all year with just a few simple habits. Clean it often, dry it well, and store it in a safe spot. Use the checklist to make sure you never miss a step. When you take care of your cooler, you always have fresh food and cold drinks ready for any season.
Stay consistent, and your cooler will always be ready for your next adventure!
FAQ
How often should you clean your hard sided lunch cooler?
You should clean your cooler after every use. Quick daily wipes keep it fresh. Give it a deep clean once a week if you use it often. This habit stops odors and keeps your food safe.
Can you put your hard sided lunch cooler in the dishwasher?
No, you should not put your cooler in the dishwasher. Hand-wash it with mild soap and water. Dishwashers can damage the seals and insulation.
What should you do if your cooler smells bad?
First, wash it with soap and water. If the smell stays, wipe the inside with a mix of vinegar and water. Let it air dry with the lid open. For strong odors, leave a cloth with vanilla extract inside overnight.
Is it safe to use bleach to clean your cooler?
You can use a diluted bleach solution for tough odors, but rinse well with water afterward. Never use strong bleach or harsh chemicals. Stick to gentle cleaners for regular cleaning.
How do you store your cooler when not in use?
Store your cooler in a dry, cool place with the lid open. This stops mold and mildew. Avoid damp basements or hot attics. Cover it with a towel to keep dust away.


 Request a quote