The market for cool boxes is booming, set to reach USD 6.5 Billion by 2025. You can achieve professional-level cooling results. Your journey to optimal chill begins before you pack a cooler. Proper cooler packing is essential for ice preservation. To keep your cooler’s ice lasting longer, follow these core principles:
- Pre-chill your cooler and everything you plan to put inside.
- Use a 2:1 ratio of ice to contents for your cooler. A mix of large block ice and smaller packs for your ice packs cool box works best.
- Pack your cooler in strategic layers, filling all air gaps to stop the ice from melting quickly.
Key Takeaways
- Pre-chill your cooler and all items before packing to keep them cold longer.
- Use a 2:1 ratio of ice to contents in your cooler for best cooling results.
- Pack your cooler in layers, filling all empty spaces with ice to stop it from melting fast.
- Choose good ice packs like KUER, YETI, or Arctic Ice for better and longer cooling.
- Set your freezer to 0°F (-18°C) and freeze ice packs for at least 24 hours for best use.
Preparation: Your First Step to a Colder Cool Box
You have your cooler. Now you need the fuel to keep it cold. Choosing the right ice source is just as important as the cooler itself. Your success depends on understanding the options available and how to use them effectively. Let’s prepare your cooling arsenal.
Choosing the Best Ice Packs for Your Cool Box
You need more than just frozen water to achieve peak cooling. Modern ice packs use advanced materials to keep your cooler colder for longer. These materials include gels, saline solutions, and phase-change materials (PCMs). Gel packs are very common. They use a substance like sodium polyacrylate to hold temperatures around 32°F (0°C). They offer good performance at a low cost. Saline solutions add salt to water. This lowers the freezing point below 32°F. PCMs are a wider group of materials. They include water, salt hydrates, and even vegetable-based compounds. Water is a great PCM for 32°F applications. Finding the best freezer blocks means matching the pack’s material to your specific cooling needs. A high-quality ice packs cool box setup often uses a mix of these technologies.
DIY vs. Store-Bought Reusable Freezer Blocks
You can make your own ice blocks or buy reusable freezer blocks. Each choice has its pros and cons.
DIY Ice Blocks Making your own ice is simple and cheap. You can freeze water in milk jugs or plastic containers. This creates large, slow-melting blocks of ice. You can also add salt or rubbing alcohol to water to make a slushy mix that gets colder than plain ice. However, DIY blocks can be inconsistent. They might also leak as they melt, creating a mess in your cooler.
Safety First! If you make your own gel-style packs, you must handle them with care.
- Always place a towel between a homemade pack and your skin to prevent burns.
- Limit using the pack to 15-20 minutes at a time.
- Wait at least two hours between uses to let your skin recover.
Store-Bought Reusable Freezer Blocks Investing in store-bought reusable freezer blocks offers reliability and superior performance. These blocks are designed for durability. They have rugged plastic shells that will not leak. The scientific formulas inside are engineered to stay frozen longer than water. You just place the reusable freezer blocks in your freezer overnight. The next day, they are ready for your cooler. These blocks are a great long-term investment for anyone serious about keeping contents cold. You can find cool bag freezer blocks for a small cooler bag or larger blocks for big cool boxes. The quality is consistent every time you pull them from the freezer.
Top Freezer Blocks for Cool Bags (Featuring KUER)
When you need guaranteed cold, you should turn to high-quality freezer blocks. The market has many options, but a few brands stand out for their quality and cooling power. These freezer blocks for cool bags are perfect for everything from a picnic to a multi-day camping trip. They are also excellent freezer blocks for lunch boxes.
KUER, YETI, and Arctic Ice are leaders in the field. Each offers unique features. Your choice depends on your specific needs. KUER Ice Bags are known for their durable build and high-performance cooling, making them a reliable choice for any outdoor adventure.
| Brand | Key Features | Primary Use | Performance Highlights | User Review/Assessment |
|---|---|---|---|---|
| KUER Ice Bags | High-performance, durable, rotational molding manufacturing | General cooling, camping, beach trips | Top scores in insulation and durability; keeps food and drinks cold for hours | Solid investment for performance and longevity; reliable gear for outdoor enthusiasts |
| YETI Ice Packs | Premium ice retention, proprietary design, freezes faster than water, versatile | Long trips, hot summer days, camping, family picnics | Keeps cooler cold for extended periods; consistently outperforms competitors in ice retention (e.g., 45-48 hours in various coolers) | Top choice for those prioritizing insulation performance; unmatched for longest ice retention |
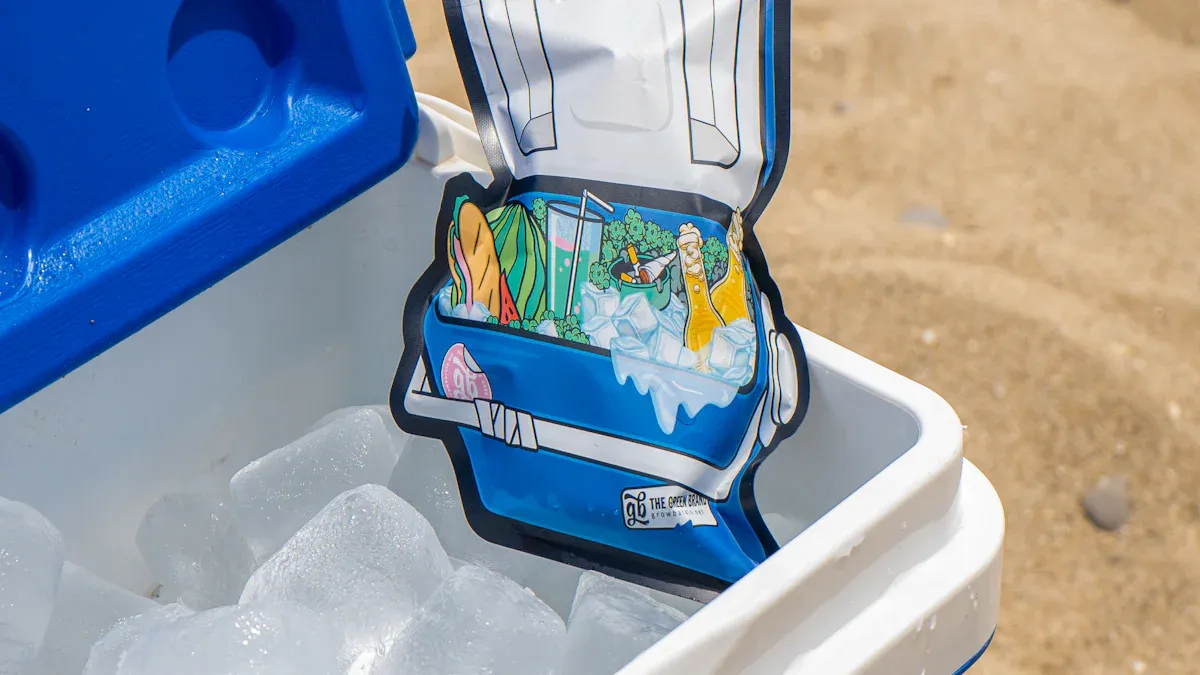
| Arctic Ice Chillin’ Brew | Unique formula freezes at 28°F (-2°C), eco-friendly, reusable, slim design | Keeping beverages frosty, tailgates, barbecues, beach outings | Ensures beverages stay frosty without freezing solid; delivers consistent results | Game-changer for beverage enthusiasts; must-have for cold drinks on the go |
KUER’s expertise in rotational molding, the same process used for high-end coolers, extends to its ice pack freezer blocks. This manufacturing experience ensures the blocks are incredibly tough. You can trust these blocks to withstand the rigors of any trip. When you pull these blocks from your freezer, you are holding a piece of well-engineered cooling technology.
Lab tests show how the best freezer blocks perform over time. Here is a look at how two popular options, Cooler Shock and Igloo MaxCold, held up over 10 hours. These ice pack freezer blocks were taken directly from a standard freezer and monitored.
| Ice Pack for Coolers | Start | 15 min | 1 hr | 2 hrs | 3 hrs | 4 hrs | 5 hrs | 7 hrs | 8 hrs | 9 hrs | 10 hrs |
|---|---|---|---|---|---|---|---|---|---|---|---|
| Cooler Shock | 4°F | 11°F | 17°F | 24°F | 26°F | 30°F | 29°F | 35°F | 37°F | 39°F | 42°F |
| Igloo MaxCold Ice Block | 5°F | 23°F | 30°F | 28°F | 33°F | 31°F | 36°F | 43°F | 37°F | 36°F | 44°F |
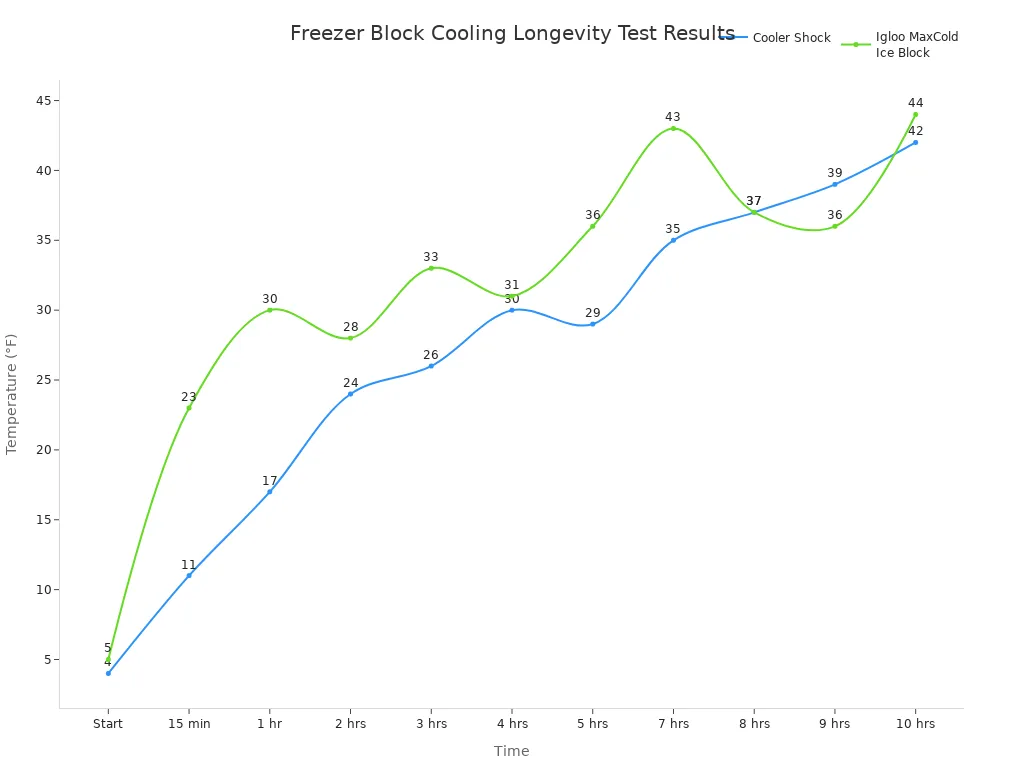
- Igloo MaxCold Ice Block: Best Overall
- Cooler Shock: Coldest
These tests show that specialized freezer blocks for cool bags significantly outperform basic ice. Using these reusable freezer blocks in your ice packs cool box is a smart move. The top uses for cool bag freezer blocks include keeping food safe, drinks frosty, and extending your trip. Whether for a large cooler or a small cooler bag, these freezer blocks for cool bags deliver results. You can even use smaller freezer blocks for lunch boxes. Always freeze your blocks completely in your freezer for the best results. A cold freezer ensures your blocks are ready for action.
How to Properly Use Your Freezer
Your freezer is the most important tool for preparing your cooling arsenal. You can turn regular ice packs into long-lasting cooling engines with the right techniques. Proper freezer use ensures your blocks are fully charged and ready to keep your cooler contents cold. Think of your freezer as a power station for your ice blocks.
Set Your Freezer to the Right Temperature 🌡️ You should set your freezer to its coldest setting. The ideal temperature is 0°F (-18°C). A colder freezer creates colder, denser ice blocks. These super-chilled blocks will last much longer inside your cooler. A standard freezer might not reach this temperature if it is old or not working well. You can use a freezer thermometer to check the actual temperature inside your freezer.
Give Your Blocks Enough Time to Freeze Patience is key when freezing your blocks. You need to give them enough time to become completely frozen.
- Minimum Time: Allow at least 24 hours for your blocks to freeze solid.
- Larger Blocks: Big blocks of ice or large reusable packs may need 48 hours or more.
- Check for Liquid: Shake a block gently. You should not hear or feel any liquid moving inside. A partially frozen block will melt very quickly.
A fully frozen block is the foundation of a well-packed cooler. Rushing this step will only lead to disappointment.
Pro Tip: A Full Freezer is an Efficient Freezer A full freezer runs more efficiently than an empty one. The frozen items inside help maintain the cold temperature every time you open the door. You can fill empty space with jugs of water or extra ice blocks to help your freezer work better.
Organize Your Freezer for Maximum Cold How you place items in your freezer matters. You want cold air to circulate freely around your ice blocks. This helps them get completely frozen.
- Clear a Space: Make a dedicated spot for your ice blocks. Do not crowd them with other food items.
- Position for Power: Place the blocks near the back or bottom of the freezer. These are usually the coldest zones.
- Stack Smartly: Leave small gaps between blocks if possible. This allows cold air to touch more surface area, freezing them faster.
Once your blocks are frozen solid, you can stack them tightly. This creates a large, frozen mass that helps keep your freezer cold. These prepared blocks are ready for your next adventure. You can grab them and go, knowing your cooler will perform at its best. Always start with deeply frozen blocks for the best results.
How to Pack a Cooler for Maximum Efficiency
Your cooler packing technique is the difference between lukewarm drinks and crisp, cold refreshment. You can master the art of the pack. This transforms your cooler from a simple container into a high-performance cold-storage unit. Smart packing is the key to long-term ice preservation. It ensures every item stays at the perfect temperature. Let’s get your cooler ready for peak performance.
The Pre-Chilling Method
You must cool your cooler before you pack a cooler. A warm cooler is the biggest enemy of ice. The insulation in your cooler walls absorbs heat from its surroundings. If you put fresh ice into a room-temperature cooler, the ice will waste its energy cooling the cooler itself. You can prevent this with a simple pre-chilling process.
- The night before your trip, bring your cooler inside.
- Fill it with “sacrificial” ice or a few frozen water jugs from your freezer.
- Let the ice sit for at least six hours. Leaving it overnight is even better.
- Before you pack, drain any meltwater. Remove the sacrificial ice.
This step super-cools the insulation. Now your fresh ice can focus on its main job: keeping your food and drinks cold. For smaller, flexible cool boxes, you can place the entire empty bag in a chest freezer overnight. You should also pre-chill all food and drinks in your refrigerator or freezer before they go into the cooler. Never put warm items directly into your cooler.
The 2:1 Ice-to-Contents Ratio Explained
For the best results, you need the right balance of ice to contents. The professional standard is a 2:1 ratio. This means your cooler should contain two parts ice for every one part food and drinks.
The Golden Rule of Cooling Aim for a cooler that is about 66% ice and 33% contents. This ratio provides the thermal mass needed for excellent ice preservation and optimal chill.
This might seem like a lot of ice, but it is crucial for performance. The large volume of ice creates a powerful cold reservoir. It absorbs heat that enters the cooler and surrounds your items in a consistently cold environment. A cooler that is mostly food with a little ice on top will warm up very quickly. Using a mix of large ice blocks and smaller cubes is ideal. The large blocks melt slowly, providing long-term cooling. The smaller cubes fill in the gaps, ensuring no air pockets remain.
Layering Your Cooler Correctly
How you properly pack your items is just as important as the ice ratio. A strategic layering system protects your food, improves cooling efficiency, and makes items easy to find. Think of it like building a cold fortress.
- Bottom Layer: Ice Foundation. Start with a solid layer of large ice blocks on the bottom of the cooler. These blocks are the foundation of your cold chain. Place your largest, heaviest blocks from the freezer here. This creates a super-chilled base that will last the longest.
- First Food Layer: Hardy Goods. On top of the ice blocks, place your first layer of food. This spot is for frozen meats and other durable items that you will not need until later in your trip. These temperature-sensitive items benefit from the direct, intense cold of the bottom blocks.
- Second Ice Layer: Fill the Gaps. Now, add a generous layer of smaller ice cubes. Pour them over the food layer, making sure the ice fills all the empty spaces between your items. These smaller ice pieces eliminate air pockets, which is vital for preservation.
- Top Food Layer: Frequent-Use Items. Place your delicate or frequently accessed food and drinks here. This includes sandwiches, fruits, vegetables, and beverages. Keeping them on top prevents them from getting crushed and makes them easy to grab without digging.
- Final Ice Layer: The Cap. Finish by covering everything with one last layer of ice. Fill any remaining space to the very top. An ice packs cool box with no empty air space is an efficient one. This final layer of blocks or cubes acts as a protective barrier.
This cooler packing method ensures the long-term freshness of your food. It provides the best environment for preservation and makes your outdoor experience much more enjoyable. Remember to keep your cooler in the shade and limit how often you open it.
Advanced Strategies for Multi-Day Trips
A single-day picnic has simple cooling needs. Multi-day trips demand a higher level of strategy. You can extend the life of your ice and the freshness of your food with a few advanced techniques. These methods ensure your cooler performs at its peak from the first day to the last. Your freezer is the starting point for all these powerful blocks.
The Two-Cooler System: Drinks vs. Food
You should consider using two coolers for longer trips. This system separates your items by use, which is great for preservation.
- The Food Cooler: Dedicate one cooler just for food. You should pack this cooler carefully with large blocks from your freezer. Avoid loose ice to keep items like cheese and greens from getting soggy. You will open this cooler less often, protecting the cold environment inside. The solid blocks from your freezer provide long-term, stable cooling for your food.
- The Drinks Cooler: Use a second cooler for beverages and other frequently accessed items. You can fill this cooler with cubed ice for your beverages. People will open this cooler often, but it will not affect your main food supply. This setup protects your perishable food. The blocks in your food cooler stay frozen longer. Your freezer prepares the blocks for both coolers.
Insulating Your Cooler from External Heat
Your cooler works hard to keep the cold in. You can help it by keeping the heat out. External heat is the biggest enemy of ice preservation.
Protect Your Cooler! 🛡️ The sun and hot ground can warm up your cooler quickly.
- Find Shade: Always place your cooler in the shadiest spot available.
- Cover It: Drape a light-colored towel or blanket over the cooler to reflect sunlight.
- Lift It Up: Place your cooler on a pallet or some blocks of wood. This stops heat from transferring from the hot ground.
These simple steps create a buffer. They help the frozen blocks from your freezer do their job for much longer.
Managing Meltwater the Right Way
You will eventually see water in your cooler as ice and blocks melt. Many people wonder if they should drain it. The answer depends on your priority.
For maximum cooling, do not drain the water. The cold water helps insulate the remaining solid ice and blocks. It fills the air gaps and keeps the temperature inside just above freezing. However, food safety is also important. If the water risks contaminating your food, you should drain some of it. A good compromise is to keep your food in waterproof containers. This gives you the cooling benefit of the water without the food safety risk. The blocks from your freezer will last longer surrounded by this cold water. Your freezer makes these blocks. The freezer is your best friend. The freezer prepares all your blocks.
Maintaining and Storing Your Cooling Gear
Your adventure is over, but your work is not done. Proper maintenance ensures your gear is ready for the next trip. You can extend the life of your cooler and ice packs with a few simple steps. This protects your investment and guarantees future performance.
Cleaning Your Cool Box Post-Trip
You should clean your cooler after every use. This prevents mold and bad smells. First, use soap and water to remove any dirt or food bits. This step is crucial for food safety. For tough odors or stains, you have several options.
- Baking Soda: Mix with water to scrub away stains.
- White Vinegar: Pour a cup inside to remove odors. Let it sit for 15 minutes before rinsing.
- Bleach Solution: For mold, mix one part bleach with nine parts water. Apply it, wait 10 minutes, and rinse well.
Cleaning removes visible dirt. Sanitizing kills invisible germs. Both are important for a truly clean cooler.
How to Clean and Store Ice Packs
Your reusable ice blocks also need cleaning. You can wipe down hard-shell blocks and gel packs with a damp cloth and mild soap. Rinse them well afterward. The most important step is to dry the blocks completely. Storing wet blocks can lead to contamination. Once your blocks are clean and dry, you can return them to the freezer. A dedicated spot in your freezer keeps them organized. Having clean blocks in the freezer means you are always ready for your next outing. Your freezer keeps the blocks ready for action.
Extending the Life of Your Equipment
You should inspect your gear regularly. Check your cooler for damage to hinges, latches, or drain plugs. Also, look at your ice blocks for signs of wear. Good preservation depends on high-quality equipment.
When to Replace Your Ice Blocks Look for cracks, damaged seals, or punctures. If a block leaks or no longer stays cold, it is time for a new one. Using damaged blocks is not a good idea.
Store your cooler with the lid slightly open to let air circulate. This prevents odors. Keep your blocks in the freezer. A full freezer runs better, so keeping your blocks in the freezer helps. Your freezer is the home for your blocks. The freezer keeps your blocks frozen. The freezer is essential. The freezer prepares your blocks. The quality of your cooling depends on well-maintained gear.
You can master your cooling game. Your success with an ice packs cool box depends on smart preparation and active management. While studies show a cooler can recover its temperature after being opened, limiting access helps. Protecting your cooler from the sun is also vital for ice preservation. Remember these key steps for your cooler:
- Pre-chill your cooler and its contents.
- Use a 2:1 ice-to-contents ratio.
- Pack everything tightly to remove air.
Following these rules ensures your cooler performs at its best.
FAQ
How long do my ice blocks need in the freezer?
You should place your ice blocks in the freezer for at least 24 hours. A colder freezer makes better blocks. Large blocks may need 48 hours. You can shake the blocks to check if they are solid before use. This ensures the blocks are ready.
Can I use different kinds of ice blocks together?
Yes, you can mix different blocks. A combination of large and small blocks is very effective. Place large blocks at the bottom of your cooler. You should use smaller blocks to fill all the air gaps around your items. This strategy maximizes cooling.
What is the most important safety tip for ice blocks?
Your safety is important. Never place homemade gel blocks directly on your skin. You should always use a towel as a barrier. This simple step prevents skin damage from the extreme cold of the blocks.
How do I make my ice blocks last longer?
You can extend the life of your blocks. Always pre-chill your cooler before packing. You should set your freezer to its coldest setting. A very cold freezer creates denser, longer-lasting ice. This preparation makes a big difference.

 Request a quote