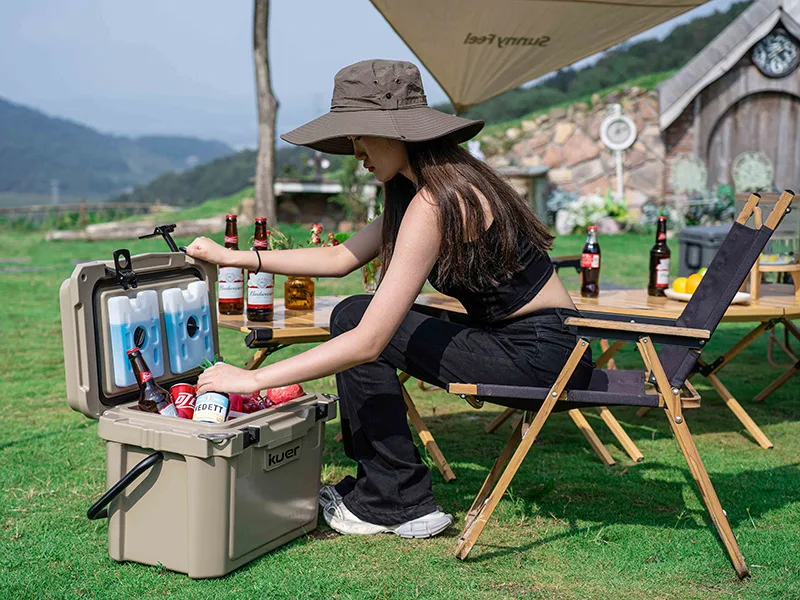

You can make your own icebox with simple tools and materials. Many companies use strong plastic and rotomolded construction for coolers like the KUER Cooler Box. This cooler keeps ice cold for seven days. It uses thick polyurethane foam to insulate. You can use these methods or recycled materials for your icebox. Beginners can build easy designs and still do well. If you want to see good quality and strength, the KUER Cooler Box has features that suppliers and buyers like.
Key Takeaways
- Build your own icebox with simple tools and materials to save money and customize the design.
- Choose at least 2 inches of polyurethane foam insulation to keep ice frozen longer.
- Use airtight seals and sturdy latches to prevent cold air from escaping and warm air from entering.
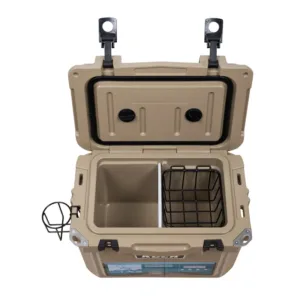
- Add practical features like cup holders, dividers, or storage compartments to improve convenience.
- Clean the icebox regularly and inspect the seals to maintain cooling performance and extend its lifespan.
Icebox Basics and What You Need
An icebox is a refrigerator that doesn’t require electricity. People used iceboxes before refrigerators became widespread. Large blocks of ice are placed inside to chill food, extending its shelf life without the need for smoking or canning. Many families and outdoor enthusiasts use iceboxes, for example, when camping, fishing, and picnicking. Iceboxes keep food and drinks cold during travel or outdoor activities.
Tools and Materials
Making an ice box requires only a few simple tools and materials. You can choose modern or recycled materials, depending on your needs and budget. Many companies use rotomolded plastics, thick polyurethane foam, and sealing gaskets. These all help the ice box function better. The KUER insulated box is a good example. It uses more than 2 inches of thick polyurethane foam for insulation and is equipped with strong sealing gaskets to keep cold air inside. These measures allow ice to be stored for up to seven days.
Essential Tools:
- Saw or utility knife
- Measuring tape
- Drill and screws
- Sandpaper
- Caulking gun
Material Options:
- Rotomolded plastic panels or sturdy plastic bins
- PU foam panels or spray foam
- Rubber gasket for sealing
- Hinges and handles for the lid
- Recycled plastic lumber or foam boards
Tip: Recycled plastic lumber is good for the environment. It does not need much care and lasts a long time. It also looks nice and saves you money in the long run.
Skills for DIY Success
Making a freezer doesn’t require advanced skills. You just need to know how to measure, cut, and assemble the panels. Sealing the seams and installing the hardware are also important. If you want to modify the design, some knowledge of insulation and sealing will be helpful. Many B2B suppliers offer custom parts and wholesale materials, which can make it easier for you to get started.
Icebox Design Choices
Size and Shape
You’ll need to choose the right ice pack size and shape. Think about your intended use, such as camping or fishing. You should also consider how much you want to put in it. Ensuring easy portability is also important. Some companies allow you to choose custom sizes when ordering in bulk. This way, you’ll get the ice pack you actually need. The table below lists some important things to consider:
| Factor | Description |
|---|---|
| Temperature Requirements | Choose insulation that keeps things as cold as you need. |
| Size and Capacity | Make sure your box fits your things and does not waste space. |
| Durability and Quality | Pick strong materials so your icebox lasts longer and works better. |
| Customization Options | You can add things like dividers or your business logo. |
| Cost-Benefit Ratio | Try to get the best value for your money. |
Insulation Methods
Insulation is crucial for any ice pack. Thicker insulation keeps the temperature low for longer. The sides of the ice pack should have at least 2 inches of insulation. If possible, the bottom should have even thicker insulation. Polyurethane foam is an ideal insulation material. Many high-quality ice packs, such as the KUER ice pack, use more than 2 inches of polyurethane foam. The table below compares the performance of different insulation materials:
| Insulation Type | R-Value per inch | Long-term Performance (R-Value) |
|---|---|---|
| Polyurethane Foam | Up to R-8.06 | R-7.93 |
| Extruded Polystyrene (XPS) | R-5 | R-3.95 (after 12 years) |
You can also use sprayed foam or recycled foam boards. But for most ice boxes, polyurethane foam is usually the best choice.
Lid and Sealing
A good lid and sealing ring prevent cold air from escaping and hot air from entering. Secure the lid tightly with a sturdy latch. Install rubber or silicone gaskets around the lid to prevent leaks. This will make your ice box waterproof. This design is commonly used in rotationally molded refrigerators. It helps the ice box keep ice cubes warm for longer and ensures food safety.
Drainage and Portability
Easy-draining and comfortable handles make your ice pack more convenient to use. A drain plug at the bottom allows melted ice water to drain quickly. Use a comfortable handle to prevent the ice pack from slipping. Many companies sell dedicated handles that offer even more comfort and safety.
Tip: If you want to make or buy a lot of iceboxes, ask your supplier about adding wheels or special handles with your logo.
Building Your Icebox Step-by-Step

Making your own ice pack allows you to freely choose the quality, size, and functions. Follow these steps to make a useful ice pack. You can use it yourself or make multiple to sell.
Outer and Inner Box
Start with the main parts. The outer box is the shell. The inner box is where you keep food.
- Cut the Panels
Use ¼” marine grade plywood for both boxes. Measure and cut the panels to the size you want. Make the outer box bigger so you can add insulation between the boxes. - Assemble the Outer Box
Use the stitch and glue method. Join the sides and bottom with wire or zip ties. Make fillets inside the joints with thick epoxy. Sand the fillets until they are smooth. Put fiberglass tape on all inside corners for extra strength. - Fit the Insulation
Cut insulation panels to fit inside the outer box. Sand the edges so they fit tight. You can use foam panels, spray foam, or recycled foam boards. - Build the Inner Box
Put the inner box panels against the insulation. Stick the pieces together with thick epoxy. Clamp them until the epoxy dries. Make fillets on all inside corners for a smooth surface. - Cap the Top Edges
Use ¼” plywood to cover the top edges of both boxes. Stick these in place with epoxy and clamp them flat. Trim and sand the cap so it matches the sides.
Tip: WEST SYSTEM epoxy is good for sticking and sealing. Many suppliers sell marine plywood and epoxy at lower prices if you buy a lot.
| Method/Step | Description |
|---|---|
| Outer Box Construction | Use ¼” marine grade plywood, make space for insulation, join with stitch and glue. |
| Inner Box Fitting | Cut panels to fit tight, stick with thick epoxy. |
| Filleting and Finishing | Make fillets, put fiberglass tape, cover with epoxy for strength. |
Adding Insulation
Insulation helps freezers maintain low temperatures for longer periods. It prevents heat from entering and keeps ice from melting quickly.
- Choose the Right Material
Polyurethane foam panels keep things cold and last a long time. You can also use extruded polystyrene (XPS) or recycled foam boards if you want to help the planet. - Install the Insulation
Cut the panels so they fit tight between the outer and inner boxes. Fill any gaps with spray foam to seal everything. Sand the edges so they fit just right. - Seal All Joints
Use epoxy or caulk to seal every seam. This stops air and water from getting in. It helps your icebox last longer.
Note: Many B2B makers use more than 2 inches of PU foam, like the KUER Cooler Box, for the best insulation.
Making the Lid
A good lid prevents cold air from escaping and hot air from entering. You need to focus on insulation and sealing.
- Cut a lid panel from marine plywood or strong plastic.
- Add thick insulation, like urethane foam, to the lid.
- Put a food-safe liner on the bottom of the lid.
- Put a rubber or silicone gasket around the edge for a tight seal.
- Use strong latches to keep the lid closed.
Checklist for a great lid:
- Thick insulation (at least 2 inches)
- Tight seal with a gasket
- Strong materials like polyethylene or polyurethane
Tip: A lid that fits tight with a good gasket, like those from top suppliers, helps keep ice longer.
Hardware and Seals
Hardware and seals make your ice box easy to use and extend its lifespan.
- Install Hinges and Latches
Use stainless steel or strong plastic hardware. Put hinges on the back and latches on the front to keep the lid closed. - Add Handles and Drain Plug
Put handles on each side so you can carry it easily. Add a drain plug at the bottom to let water out fast. - Seal All Edges
Put silicone or marine sealant around all joints and hardware. This stops leaks and makes your icebox stronger.
Many custom and wholesale suppliers sell hardware and accessories with logos. You can add your logo or pick special features for B2B orders.
By following these steps, you can create a sturdy, durable icebox that performs like top-brand products. You can modify the design to suit your needs or mass-produce it for sale.
Boosting Efficiency and Finishing Your DIY Icebox
Improving Ice Retention
Here are a few tips to help your ice cube tray stay cold for longer. First, let the ice cube tray cool down before filling it with anything. This removes excess heat and helps the ice cubes stay cold. You should also refrigerate food and drinks before filling it with anything. If you put in refrigerated food, the ice cubes won’t melt as quickly.
Here are some ways to keep ice longer:
- Use more ice and pack it close to your food.
- Add gel packs or dry ice for more cooling.
- Try not to open the lid too much.
- Pick thick foam panels for better insulation.
Cooling the ice pack down first, then adding ice packs, really works. Cold food and drinks lower the internal temperature of the ice pack, slowing down the melting of the ice. Good insulation materials, such as expanded polystyrene foam or vacuum insulation panels, can also effectively maintain a low temperature.
Custom Features
You can add special features to your refrigerator to better suit your needs. Many suppliers sell a variety of accessories to make your refrigerator look better and be more convenient to use. For example, you can add cup holders, cutting boards, or shelves to keep the interior of the refrigerator tidy. Some companies can even print your logo on the refrigerator or customize a custom handle for you.
Tip: Ask your supplier about special accessories if you want to make or sell lots of iceboxes.
Maintenance
Regular cleaning and maintenance of your refrigerator can extend its lifespan. It is recommended to clean and disinfect it twice a year; if used frequently, increase the cleaning frequency. Wipe the inside of the refrigerator monthly, check for scale buildup, and replace the filter as needed. Carefully observe the inside of the refrigerator for signs such as clumps or unusual noises. Address any issues promptly to prevent them from worsening.
If you take care of your icebox, it will last longer and work better for trips or business.
You can build your own freezer and enjoy many benefits. Not only will you save money, but you’ll also learn new skills and create a cooler that suits your needs. Many people encounter some challenges at first, but you can overcome them by following these tips:
- Watch the temperature and fix leaks quickly.
- Keep airflow clear and check for blockages.
- Clean and check seals often for best results.
Start with a simple design and then gradually improve it. Use the quality and functionality of KUER insulated boxes as a reference.
FAQ
How long can a homemade icebox keep ice?
With thick insulation and proper sealing, ice can stay cold for up to 5 days. This can be achieved using polyurethane foam and sealing gaskets, similar to the KUER cooler.
What materials work best for insulation?
Polyurethane foam boards offer the best performance. Many suppliers use this material to produce custom and wholesale cold storage boxes. You can also achieve good performance using XPS foam or recycled foam boards.
Can I add custom features to my icebox?
Yes! You can add cup holders, dividers, and even your company logo. Many manufacturers offer custom accessories for B2B orders. This helps you create a bespoke product that meets your specific needs.
Is it cheaper to build or buy an icebox?
Making your own freezer is usually cheaper than buying a high-end one. You can save on labor costs and choose materials from wholesale suppliers. Furthermore, you can control the quality and functionality of your freezer.
What tools do I need to manufacture an icebox?
You’ll need a saw, a drill, a measuring tape, and a caulking gun. Many B2B manufacturers use these basic tools when handling orders of all sizes. You can find these tools at most hardware stores.


 Request a quote